Introduction
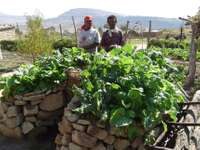
Home gardens are typically small growing areas near the homestead that contain crops of specific importance to the family. Home gardens offer quick access to herbs, fruits, and vegetables that help boost household nutrition. Because these gardens are close to the home, growers can manage them more intensively to monitor for pests, fertilize on time, and harvest for optimum ripeness. These gardens are also a good place for plants of medicinal value to the family. Often women or children oversee home gardens, managing them as they juggle various other chores throughout the day.
This article will detail step-by-step instructions for how to make a tire garden, sack garden, and keyhole garden. If you are growing with minimal space or minimal soil, there are other garden options you may want to look into such as 100-fold gardens (Edwards and ECHO Staff, 2019), container gardening, shallow beds, wick gardens (Price, 1996), and ‘door frame’ beds (MissionAssist, 2019). ‘Double Dug [http://edn.link/znwamt]’ (also called ‘Deep Dug’) beds are another option that requires more space and soil in the home garden (Javasson et al., 2007).
One key advantage of contained gardens like the tire, sack, wicking, keyhole, and 100-fold gardens is that you select the substrate for the growing space when you build it and, therefore, can start with fertile soil. You can use compost, aged manure, or other growing mediums well suited to crop growth. The main limitation of these gardens is that the substrate dries quickly and requires frequent watering (daily or every two days). ECHO Technical Note 31 (Price, 1996) details additional benefits and limitations of above-ground gardens. Table 1 summarizes some benefits and tradeoffs of home garden options in this article.
| Benefits | Tradeoffs |
|---|---|
| Can grow food in urban areas and places with compacted, rocky, or shallow soils where in-ground gardening is not possible. | Roaming animals near the homestead may feed on plants in the gardens. See other options/considerations later in this article for ideas of how to handle this. |
| Easily accessible and adaptable. | |
| The height of some designs allows you to tend plants without bending over. | Growing substrates of these gardens dry out faster than in-ground gardens due to above-ground exposure to wind, heat, and intense sunlight. |
| Heavy digging is not required. | Input intensive at the beginning. |
| Recycles waste (tires, sacks, bottles, organic material). | Depends on the availability of compost or other suitable growing substrate. |
| Allows for immediate control of soil health. | Chores around the home may limit time dedicated to taking care of these gardens consistently. |
| Avoids soil-borne problems (diseases, pests, and pH extremes). |
When looking for substrate to fill tire, sack, or keyhole gardens, ECHO recommends you use what is locally available and will meet crop growth requirements. A general guideline is to use a 1:3 ratio of compost or aged manure to soil. Do not use heavily degraded, contaminated, or compacted soils for substrate.
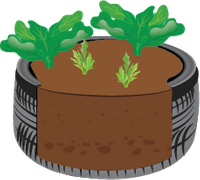
Figure 1. Tire garden cross-section view. Source: ECHO Staff
Tire Gardens
Tire gardens (Figure 1) are often seen in urban or peri-urban areas where families have little space or soil for growing crops. Where tires are a waste material, these gardens are a good choice for home gardening. Explore other home garden options if tires are not a waste material or if rubber recycled from tires has other local uses. The issue of heavy metal contamination of soil and plants from tires was addressed in EDN 130 (Fisher and ECHO staff, 2016). These gardens are best suited for crops with shallow root systems such as lettuces, spinaches, and other leafy annual greens.
Materials
- Tire (any size)
- Sharp knife or another cutting tool
- Material to line the bottom of the tire
- Plastic bottles with lids (optional) or other low-density material
Instructions
Step 1
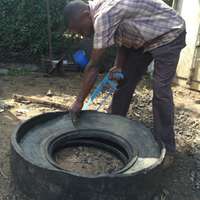
Cut the top of the tire along the outer rim (tire sidewall) so that it is fully detached. You can use a boxcutter, hand saw, knife, or other sharp instrument with care.
Step 2
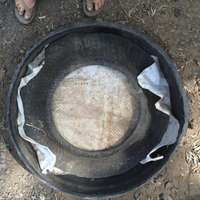
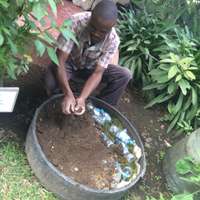
 Place material at the bottom of the tire to fully cover the hole. You can use plastic as described in TN 31 by Price (1996) or something permeable, like a piece of a polypropylene grain sack or plastic with holes, that allows for drainage and will not decompose and collapse. Here we show permeable material, which minimizes weight by allowing water to drain.
Step 3
 Place the cut piece from the top of the tire upside down on the inside of the tire. This weighs down the bottom material, holding it in place.
Step 4
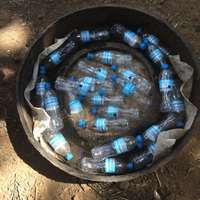 This step is optional. To reduce the weight of the tire garden, add empty plastic bottles with lids on to take up space. The air inside the bottles is lighter than soil that would otherwise occupy this space. If you are concerned about microplastics, use organic material to make it lighter such as coconut husks, pinecones, or corn cobs.
Step 5
 Fill the tire garden with healthy growing substrate and plant! You can place these gardens on the ground or on top of structures to keep them out of reach of animals.
Watch a video showing:
- Making a tire garden from start to finish at : minutes 6:27 to 13:06 of this video - http://edn.link/jmrdpm
- A variation of tire gardens used in Haiti at: http://edn.link/qryapn
Sack Gardens
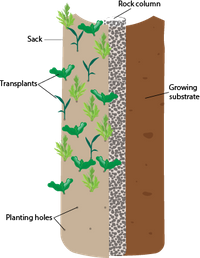
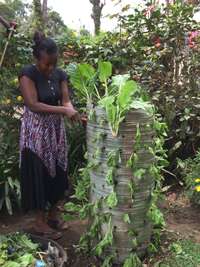
Figure 2. Sack garden mid-planting with cross-section view to soil and rock sections. Source: Stacy Swartz
Sack gardens (Figure 2) are very popular in schools and other community groups because they provide a fun way to engage individuals and are productive in small spaces. They are typically used in areas where vertical growing is ideal, like along the side of a building or walkway. Sack gardens are watered through a center column of rock that funnels the water down the sack’s height so that it is more evenly distributed. The rock column also helps aerate the soil. The materials for these gardens break down over a few seasons. Their lack of permanence and small footprint makes them ideal for urban settings, refugee gardens, or rented accommodations. These gardens are best suited for crops with shallow root systems such as lettuces, spinaches, and other leafy annual greens though you can plant a few deep-rooted plants on the top of the garden.
Materials
- Large sack (like those used for transporting carrots, onions, or potatoes)
- Small rocks
- Green, fibrous plants such as freshly cut grass (optional)
- Sharp knife or another cutting tool
- Small round container (about ¼ the diameter of the sack ) with the bottom cut off
Instructions
Step 1
 Place the sack where you want it to be in your garden. This is important as once filled, it will be too heavy to move.
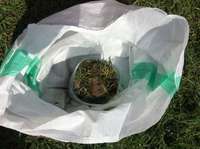
Open the base and put the container in the center. Fill the container with layers of small rock and fibrous plant material (optional; adding fibrous plant material helps fill larger gaps in the rock column, slowing down the water to create more even watering).
Step 2
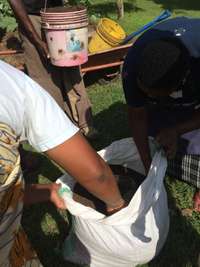 Fill the outside with healthy growing substrate, making sure to hold the outside of the sack taut so that there are no gaps. Pull the center container up as you add substrate, thus making a uniform column of rock and fibrous material in the center of the sack. Pack the substrate as you fill the sack to ensure that it is sturdy and will stay upright.
Step 3
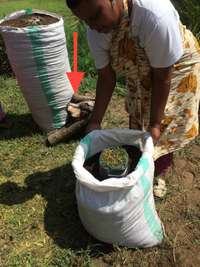 It is helpful to roll the outside of the sack so that it’s easy to keep taut and unroll as you fill the sack. Continue to pack the soil well until the sack is full. Water the soil thoroughly and check to make sure that it will remain upright. If building a sack garden on a hillside, add a brace on the downward side of the sack garden with logs, stone, brick, or other sturdy material (red arrow).
Step 4
 Poke holes in the outside of the sack using a sharp utensil. Holes should be 10 to 20 cm apart depending on the crop. Triangulate holes to keep plants from shading the plants below them. Place seeds or seedlings into the holes, making sure of good soil contact.
Transplants will likely droop for a day or two but usually recover quickly and re-direct growth upward.
Another way to make the center rock column is to add a post (~10 cm) into the center while packing moist soil into the sack . Using moist soil helps retain the empty center column after you remove the post. Once the sack is full, carefully twist and pull to remove the post and fill the empty column with rocks.
One option to stabilize the sack garden if needed, is to add sticks that are at least as tall as the sack on the outside of the sack to add support.
Sack gardens typically only last a couple of seasons because the sack material breaks down and/or planting into the previous holes becomes too difficult. However, that can be lengthened by planting perennial vegetables like fine-leaved sweet potato vines (Ipomoea batatas), New Zealand spinach (Tetragonia tetragonioides), Russian comfrey (Symphytum x uplandicum), or herbs.
Watch a video showing the construction of a sack garden from start to finish at: http://edn.link/nrw66a
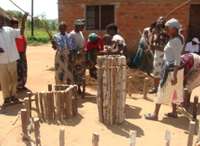
Keyhole Gardens

Figure 3. Keyhole garden diagram with stick and stone examples for borders. Source: Stacy Swartz
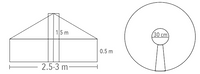
Figure 4. Keyhole gardens appearance from the side (left) and top (right). Source: David Hall
Keyhole gardens (Figure 3) are effective, adaptable gardens that have popped up outside homes across East Africa. The garden is roughly 2.5 to 3 m in diameter and 1 m tall with a center column of organic waste that is about 1.5 m tall. The soil slopes from the outside of the center column down to the retaining walls. Organic waste materials (weeds, kitchen scraps, and manure) and water are regularly added to the center column. Moisture and dissolved nutrients seep into the surrounding soil in the garden. Gardeners access the center through a small pathway which makes the garden look like a keyhole from an aerial view (Figure 4; Kinsey, 2010). A benefit of keyhole gardens over tire or sack gardens is that they provide enough rooting depth for larger vegetables such as peppers, eggplants, and tomatoes. Where water for gardening is limited, put keyhole gardens beside the home kitchen to reuse kitchen and bath water for irrigation. 1
Materials
- Stick, stone, bamboo, or other material that can create a border to contain soil
- String 1.25 to 1.5 m long
- String about 15 cm long
- Sticks cut to 1.75 to 2 m tall (about 12-20 depending on size)
- Mulching material
Instructions
Step 1
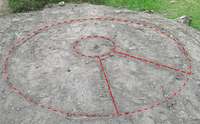 Tie the longer string to a stake at the center where you will build the keyhole garden and hold a stick at the opposite end. Drag the stick in a full circle, outlining the circumference of the keyhole garden. Repeat with the shorter string. You will now have two circles with the same center. The inner circle will have a diameter of about 30 cm and the outer circle will have a diameter of 2.5 to 3 m. Draw the keyhole section that allows access to the center column.
Step 2
 Drive the 1.75 to 2 m tall sticks into the ground, around the smaller circle u ntil they create an enclosed column. It’s helpful to tie the sticks together at the top to hold them in place.
Step 3
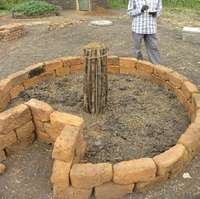 Stack bricks, sticks, bamboo, or other wall material to form the outside retaining walls. The retaining walls should be 50 cm high.
Step 4
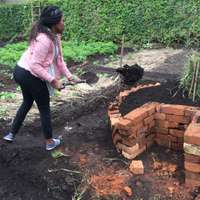 Fill the area between the center column and the retaining wall with growing substrate.
Step 5
 Add mulch to the top and plant seeds, cuttings, or seedlings into the garden.
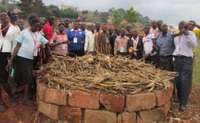
Step 6
 Add organic waste, manure, and water to the center column over time. Also water the top of the garden, especially during dry times of the year. Without high organic matter content or clay, water does not wick all the way to the retaining walls from the center column.
Figure 5. Keyhole garden made of sticks and without the center column. Source: Stacy Swartz
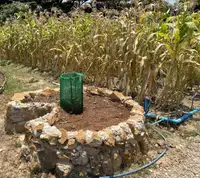
Figure 6. Keyhole garden with rock and concrete mortar and plastic mesh center. Source: Abram Bicksler
If you do not wish to, you do not need to have a center column. Keyhole garden retaining walls do not need to be made of stone. You can use sticks to create posts that smaller sticks (Figure 5), damaged sacks, or old clothes can be woven between to create a barrier. Similarly, use what materials you have available to make the center column such as plastic mesh (Figure 6), wire mesh, or bamboo.
Watch a video of making a keyhole garden from start to finish at: http://edn.link/jtcda7
Other considerations/options for gardens
Overcoming water stress
To help with water stress, you can add mulch to any of the garden options. Mulch helps reduce evaporation from the soil and subsequent water loss. Substrate high in organic matter will also help retain moisture and reduce water stress of crops.
Detering roaming animals
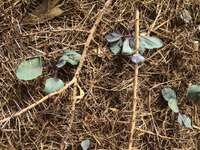
Figure 7. Thorny branches around young transplants of a keyhole garden. Source: Stacy Swartz
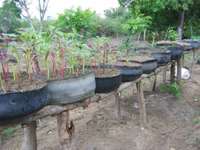
Figure 8. Tire gardens on wooden posts in Haiti. Source: Danny Blank
Some farmers add thorny branches over transplants in home gardens to deter roaming animals from destroying plants (Figure 7). Alternatively, you can elevate gardens high enough that livestock cannot reach them (Figure 8). Plant perennial vegetables such as chaya (Cnidoscolus aconitifolius) as hedges around these gardens to reduce animal access, maximize growing space, provide dispersed shade, and increase nutrition in the garden.
Conclusion
Home gardens are adaptable, so use what you have available to create the ideal size and type of garden to fit your needs. Make the most of the opportunity to have healthy substrate for growing plants and maintain soil health over time by adding organic material, soil amendments (e.g. compost), and/or mulch to the system over time. After establishment, these gardens are zero-till for several seasons, just plant and harvest all year. Plant crops of value or importance in home gardens, not field crops.
Additional options for the home garden
- 100-fold gardens [http://edn.link/tn95] (Edwards and ECHO Staff, 2019)
- Container gardening, shallow beds [http://edn.link/tn31] (Price, 1996)
- ‘door frame’ beds [http://edn.link/t9q3d6] (MissionAssist, 2019).
- ‘Double Dug’ (also called ‘Deep Dug’) (Javasson et al., 2007).
References
Edwards, L. and ECHO staff. 2019. 100-Fold Vegetable Gardens with Low-Cost Wicking Beds. ECHO Technical Note no. 95.
Fisher, B. and ECHO staff 2016. Tire Contaminants from a Container Gardening Perspective. ECHO Development Notes no. 130.
Javasson, E., J. Machinga, W. Ritte, and D. Jochnick. 2007. Bio-Intensive Agriculture Handout. Global Service Corps.
Kinsey, E. 2010. Global Service Corps. Keyhole Gardens.
MissionAssist. 2019. Gardening in a Small Space. Mission Assist.
Price, M.L. 1996. Rooftop and Urban Gardening. ECHO Technical Note no. 31.
Walle, R. 2025. Grey Water for Watering Plants. ECHO Development Notes no. 168.