VITA 1600 Wilson Boulevard, Suite 500 Arlington, Virginia 22209 USA Tel: 703/276-1800 . Fax: 703/243-1865 Internet: pr-info@vita.org
This manual was compiled by VITA (Volunteers in Technical Assistance) from material based on the experience of several field workers who have used the CINVA-Ram Block Press. It is hoped that the manual will make it easier to use the machine. VITA would appreciate receiving any criticisms or suggestions for improving the manual.
VITA, Inc.
First printing 1966 Revised January 1972 Minor revision May 1975 Reprinting February 1977
Table of Contents
I. INTRODUCTION II. EQUIPMENT
III. TESTING SUITABILITY OF SOIL
IV. MAKING BLOCKS AND TILES
V. BUILDING
VI. REFERENCES
VII. OTHER MACHINES FOR MAKING BLOCKS FROM STABILIZED EARTH
VIII. STRUCTURAL CHARACTERISTICS OF SOIL-CEMENT BUILDING BLOCKS
I. INTRODUCTION
1. Purpose This manual combines the experience of four men who used the CINVA-Ram Block Press and figured out answers, bit by bit, to the inevitable problems of detail as they came up day after day. That was the hard way to learn how to use the press; this handbook is intended to make it easier.
2. The Press The CINVA-Ram Block Press is a simple, low-cost portable machine for making building blocks and tiles from common soil (see Fig. 1). The press, made entirely of steel,
has a mold box in which a hand-operated piston compresses a slightly moistened mixture of soil and cement or lime. (An equipment list is on page 3.)
The press was developed as a tool for small individual or mutual self-help programs. It was designed by Raul Ramirez, an engineer, at the Inter-American Housing Center (CINVA) of the Organization of American States in Bogota, Colombia.
3. Advantages CINVA-Ram blocks and tiles have many advantages over other building materials.
**They are easier to make than concrete blocks: they can be removed immediately from the press and stacked for curing without the use of a pallet.
**The cost of building material is greatly reduced, since most of the raw material comes from your own land.
**Transportation costs are avoided since the machine is portable and the blocks are made near the construction site.
**Depending on the quality of materials used, CINVA-Ram blocks can be superior to adobe and rammed earth.
**The blocks are easily handled.
**The blocks need no baking, since the curing process is completely natural .
**The press makes variations of the block adapted to the various phases of construction.
4. Note to the Field Worker When teaching people how to use the CINVA-Ram Block Press, make your instructions as simple and clear as possible. Do not quote from this manual, but master each phase of the operation so that you can teach it in your own words. Encourage the workers to take satisfaction from the completion of each step, every one of which is a move toward the final goal.
5. Soil testing, block production and the use of the blocks are all important, but they are less important than the will of the families to help themselves in building a home. This may well need to be awakened and supported by your words of encouragement and inspiration.
6. Try to make at least one person in the group familiar with the whole operation so that the local community will possess the skill to carry on the work alone.
II. EQUIPMENT
7. CINVA-Ram Block Press
Weight: 140 lbs. (63 kilos)
Height and base width: 10" x 16" x 26" (24 x 37 x 64cm)
Application force of lever: 80 lbs. (36 kilos)
Bearing Strength (Fully cured blocks) 200-500 psi (14-35 kg/[cm.sup.2])
Size of block (3-1/2" x 5-1/2" x lays up 4" x 6" x 12" 11-1/2") (9cm x 14cm x 29cm) (10 x 15 x 30cm)
Size of tile (1-1/2" x 5-1/2" x lays up 1-1/2" x 6" x 12" 11-1/2" (5cm x 14cm x 29cm) (5 x 15 x 30cm)
Average number of blocks or tiles 300-500 can be made by two people per day:
Average number of blocks needed 2500 for a two-room house:
Average number of blocks per 150 100 lbs. of cement:
Inserts: Four different molds for producing different kinds of blocks and tiles. Cost in United States: $175 FOB Warehouse Tallmadge, Ohio
AVAILABLE FROM: Bellow's Valvair International 200 W. Exchange St. Akron, Ohio 44309 216-762-0471
Metalibec Ltda. Apartado Aereo 233-NAL 157 Bucaramanga, Colombia South America
Materiel Industriel et Menager Japy 6 rue de Marignana Paris [8.sup.e] FRANCE
Frazer Engineering Company 116 Tuam Street Christchurch, NEW ZEALAND
8. Other Equipment Needed
1 Wide-mouth glass jar
1/4" to 3/8" (6mm to 10mm) mesh wire screen
Box, inside dimensions: 24" x 1-1/2" x 1-1/2" (60cm x 4cm x 4cm)
Fine sieve
Suitable mixing boards - good sizes are 4' x 8' and 8' x 8' (1.2M x 2.5M and 2.5M x 2.5M)
Bottomless measuring box
Bottomed measuring box
Shovel
Sprinkling can
Mounting board at least 9' long, 8" wide and 2" thick (2.50M x 20cm x 5 cm)
4 Bolts at least 1/2" (1.5cm) diameter and 3" (8cm) long
8 Washers
III. TESTING FOR THE SUITABILITY OF THE SOIL
9. Need for Testing Making blocks from stabilized earth is a simple process, but it will not be successful unless the soil is properly tested. It would be a serious mistake to treat this step lightly. Scarce money and labor could be wasted for an unsatisfactory result.
10. Soil is a variable and complex building material. Every sample is different from every other sample. But building blocks can be made successfully from a wide variety of soils.
11. Purpose of the Tests The tests described here will tell us:
(1) How much sand and how much clay is in the soil to be used (Particle Determination Test and Compaction Test, paragraphs 16 and 17).
(2) How much cement or lime should be added (Box Test, paragraph 18).
12. Clay It is mainly the clay content which gives the mixture cohesion.
13. Stabilizer One of the important functions of the stabilizer is to reduce the change in the volume of the clay, which swells as it takes up water and then shrinks as it dries. Portland cement is the best stabilizer, but slaked lime can also be used. In some areas, lime is readily available and cheaper than cement. With lime, a higher percentage is needed for stabilizing than with cement. Lime does not work well with all soils, however; careful experimentation is therefore necessary. Lime can often be used with excellent results in combination with cement. This cuts down on the amount of cement needed. But it is important to remember that lime dries more slowly and therefore needs a longer curing period. Tests have shown good results with 1/3 cement - 2/3 lime mixture.
14. Organic impurities Organic material is found in the surface layer of most soils. Soil used for block making should be reasonably free of organic matter, which hinders the setting and hardening of the cement and results in weak blocks. Therefore, the topsoil should not be used unless most organic material is removed.
15. Mixture A wide range of soils is suitable for making blocks. We want: (1) a good proportion of sand to form the body of the block; and (2) a certain amount of cohesive or plastic fine particles (clay) to bind the sand particles together. Good blocks can be made with even a small amount of clay, but there must always be some clay. If a small amount of stabilizer is enough, save on cost reducing the amount used. Learn to find sand by testing, because soils commonly considered clay may contain a good percentage of sand.
Simplified Field Tests
16. Particle Determination Test This test analyzes the soil to find the ratio of sand to clay and/or silt:
(1) Pass the soil through a 1/4" (6mm) screen
(2) Pour into a wide-mouth jar enough soil to fill the jar half full.
(3) Fill the jar with water and cover it.
(4) Add 2 teaspoons of salt to help the clay/silt particles settle faster.
(5) Shake the jar vigorously for 2 minutes.
(6) Set the jar on a level spot.
The soil should settle in about half an hour. The sand will settle quickly to the bottom. The clay/silt particles will settle last. Measure the layers to determine the ratio of sand and clay/silt (see Fig. 2).
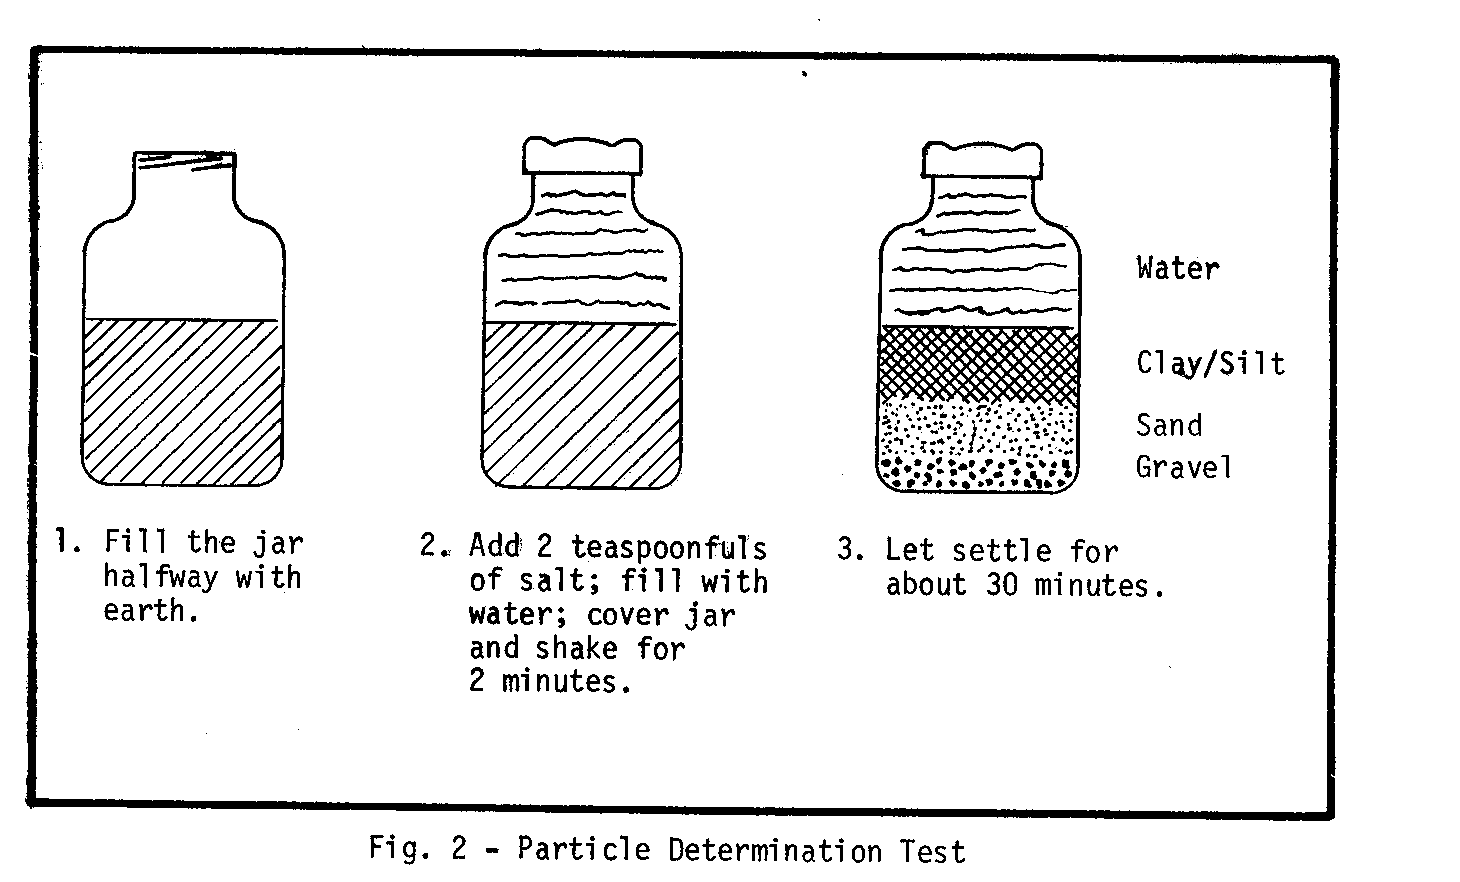
Use soil that is at least one-third sand and between 5 and 30% Clay/silt. If the soil at hand is not suitable, it can be made suitable by adding sand or clay. Record the percentages of sand and clay/silt in the soil used. This will help in deciding which soil makes the best blocks.
17. Compaction Test. This test indicates the packing quality of the earth, which depends on the percentage of clay in the sample.
(1) Take a handful of dry, screened earth and moisten it until it is damp enough to form a ball when squeezed in the hand, but not so damp that it will leave more than a slight trace of water on the palm.
(2) Drop the ball from a height of about three feet onto hard ground. If the ball breaks into a few smaller pieces, the packing quality is good to fair. If it disintegrates, the quality is poor.
18. Box Test The box test is a guide to the proper soil-cement ratio. It measures the shrinkage of soil which contains no stabilizer. The box should have these inside measurements: 24" x 1-1/2" x 1-1/2" (4cm x 4cm x 60 cm) (see Fig. 3).
(1) Oil or grease the inside surfaces of the box thoroughly.
(2) Pack the box well with moist soil (previously passed through a 1/4" -3/8" (6mm-10mm) mesh screen). The soil should be moistened to pack well, but it should not be muddy.
(3) Tamp, especially at the corners.
(4) Smooth off the surface with a stick.
(5) Place the box in the sun for three days or in the shade for seven days. It should be protected from rain.
19. Measure the contraction (shrinkage) by pushing the dried sample to one end of the box.
Shrinkage Cement to Soil Ratio
Not over 1/2" (15mm) 1 part to 18 parts
Between 1/2" and 1" (15mm - 30mm) 1 part to 16 parts
Between 1" and 1-1/2" (30mm - 45mm) 1 part to 14 parts
Between 1-1/2" and 2" (45mm-60mm) 1 part to 12 parts
When lime is used instead of cement, use double the amount. Do not use the soil if it has many cracks (not just three or four); if it has arched up out of the box; or if it has shrunk more than 2" (60mm).
IV. MAKING BLOCKS AND TILES
20. The proportion of cement and/or lime needed to stabilize the mixture has been determined by the box test.
21. The number of blocks and tiles needed should be calculated from the plans for walls and floors. Three blocks (laid flat) give one square foot of wall (33/[m.sup.2]); two tiles give one square-foot of flooring (22/[m.sup.2].
22. You may not be present during the block-making. Go through each step with the group doing the work until you are satisfied that the steps are clearly understood. Be generous with encouragement. Organize the physical layout of the
steps of the operation as efficiently as possible. The movement of the operation should be a flow of work, with the fewest possible number of footsteps, toward the final stacking near the construction site in the following order:
(1) Digging and screening the soil
(2) Preparing the mixture
(3) Pressing the blocks
(4) Curing and stacking the blocks
23. Circumstances will not always permit a direct flow. Therefore, some forethought is needed to set up the best operation for your situation.
Digging and Screening
24. Digging At the selected excavation spot, strip the surface soil of all vegetation. If the vegetation is carefully removed and stored, it can be used later for planting around the completed house or for replanting the soil supply pit.
25. The amount of topsoil which must be removed to avoid getting organic matter into the mixture varies in different locations. It may go to a surprising depth of several feet, or it may not be necessary to remove any at all. Normally, six inches to a foot (15cm-30cm) should be enough.
26. Generally the soil gets sandier as the hole gets deeper. Sandy soil with a low proportion of clay makes the best blocks. Sometimes a layer of clay subsoil will be followed by very sandy soil, and combining the two in the screening or mixing steps will produce a stronger block.
27. If, as the hole gets deeper, the pit produces soil which is not good for block-making, there is no choice but to enlarge the excavation area.
28. The person supervising the work will probably not be present during the digging. Therefore he should give a simple explanation of soil composition at the start of digging so that any pronounced change in sand or clay content will be noticed.
29. In Case of Rain In a period of alternating showers and sunshine, provision should be made to cover the pit (for example, with roofing sheets), so that work can continue immediately after the showers. Where surface water can run into the pit, put up a small retaining barrier of soil. The pile of screened soil should, of course, be protected by a covering which will shed most of the rain.
30. Screening The soil should be screened through 1/4" or 3/8" (6mm or 10mm) wire mesh (see Fig. 5).
The screen should be mounted at a level where it can be shaken by hand without back-bending; for example, by suspending it from two trees or posts (see Fig. 5). The screening operation is one where women and children can help in block-making.
31. It is important to keep the CINVA-Ram operating steadily. It should not be idle while soil is being dug and screened
32. Experience is needed to know how large a stockpile of screened earth is needed for different sized buildings. It can be estimated, since it will take up 1-1/2 to 1-2/3 times its volume in the compacted blocks.
33. Preparing the Mixture The importance of thoroughness in both cement mixing and moisture mixing, two distinct steps in preparing the mixture, cannot be emphasized too strongly.
34. Cement Mixing A suitable mixing board (good dimensions: 4' x 8' or 8' x 8' [1.2M x 2.5M or 2.5M x 2.5M]) is needed. A flat concrete slab or an area of compacted and stabilized earth serves equally well.
35. Measuring boxes whose sizes can be determined from the tests in paragraphs 16-19 can be very effective in making sure that the correct proportions of soil and cement are mixed.
(1) Set a large bottomless measuring box on the mixing board.
(2) Fill it with soil and level off the top.
(3) Lift the box, leaving a measured pile of soil on the board. The soil should be spread out over the mixing board as the box is lifted.
(4) Use a smaller bottomed measuring box for a measured amount of cement. The cement should be emptied evenly over the soil.
(5) After the proper number of boxes are emptied on the mixing board, mix the cement and soil by turning it over with a shovel until it changes uniformly throughout to a different shade of color.
36. Do not use lumpy cement. Pass it through a fine screen (window screen or finer); discard lumps which will not break up easily with the fingers and pass through the screen. 37. Moisture Mixing
(1) Spread out the thoroughly mixed soil-cement mixture on the mixing board.
(2) Add water with a sprinkling can without making puddles (see Fig. 6).
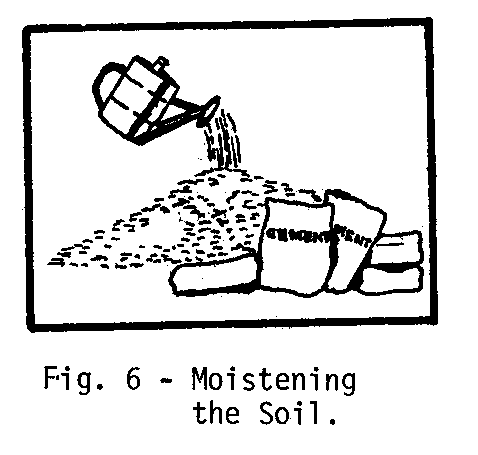
(3) Mix it thoroughly again, by turning it over with a shovel.
38. Keep the amount of water less than what seems to be enough. More water can be mixed in, but much time can be lost in getting rid of excess water.
39. With a little experimentation it will be possible to calculate the amount of water for each mix. This will save the time it takes to make small additions of water and repeat the mixing process. It is important to remember that the mixture will look as though it is not moist enough.
40. Testing for the Correct Amount of Moisture. The correct amount of moisture is quickly learned through experience. To test it, squeeze a handful of the mixture. (See Fig. 7.)
If it is moist enough it will keep the shape it is squeezed into. If dropped onto a hard surface from shoulder height, it should break into small fragments. The mixture is too moist if water is squeezed out of the top of the machine box when a block is pressed.
41. The mixture should be used within one hour after water has been added.
42. Pressing the Blocks The first point that must be driven home to all operators of the CINVA-Ram is that they should not put too much strain on the machine when they press a block. Never should two men press on the handle to bring it down in making a block. Nor should anyone jump on the handle to force it down with repeated thrusts of his body. This point cannot be emphasized too strongly because such a strain will damage the machine.
43. Mounting the Machine The CINVA-Ram Press (see Fig. 1) should
be mounted on a board at least 9' long, 8" wide and 2" thick (2.5M x 20cm x 5cm). A narrower board will let the press tip sideways; a shorter board will lift up at the ends, making it hard to get the right amount of pressure on the block; a thinner board will split under pressure.
44. The bolts should be at least one-half inch in diameter and three inches long (1.5cm x 8cm). It is good to put washers under the heads of the bolts on the underside of the board, especially on the end of the press with the lower rollers, since this end receives the greatest pressure. The washers help to keep the bolt head from pulling through the board. If the heads do start to pull through, install larger washers immediately; the great strain put on a loosely mounted press can easily throw it out of adjustment and eventually break it.
45. Pressing.
(1) Open the cover.
(2) Make sure the piston is all the way down. If it is part way up it will not be possible to get the correct amount of mixture into the box.
(3) Dump the proper amount of soil-cement mixture into the box (see Fig. 8). The supervisor
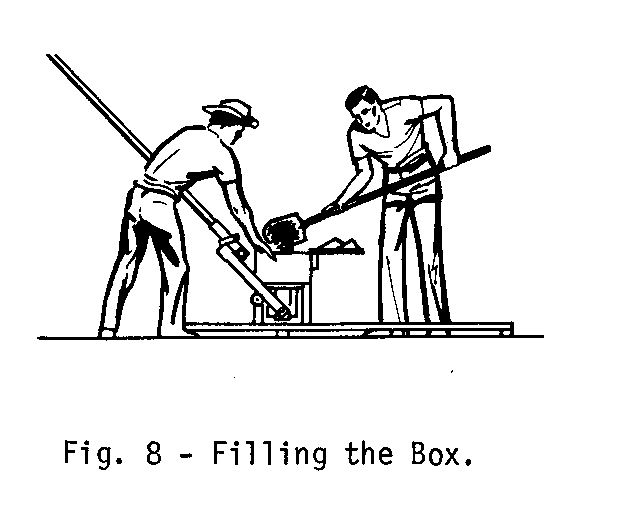
should determine the correct amount of mixture for each block - a measuring box can be used to make sure that the same amount is used each time. Uniformity in loading is absolutely necessary for producing uniform blocks.
(4) Fill the corners of the box to the top so that the corners of the finished block will be well pressed.
(5) Press a bit in the corners with your fingers.
(6) Replace the cover.
(7) Move the lever to a vertical position, letting the lower rollers fall into place (see Fig. 9).
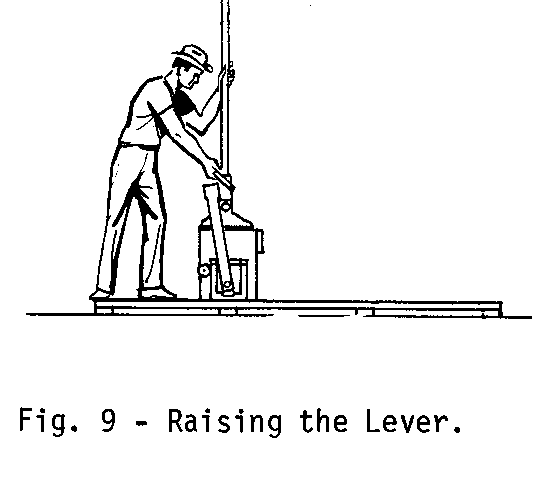
(8) Disengage the lever latch.
(9) Move the lever to a horizontal position on the side opposite the lower rollers.(compression cycle) (see Fig. 10). If the
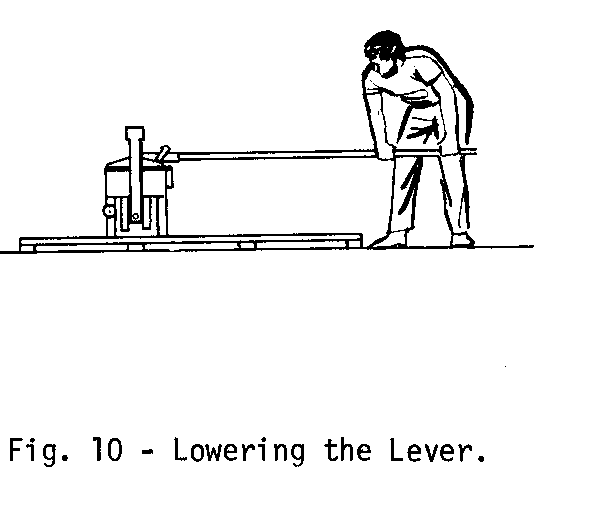
right amount of mixture is used, one man of average weight should be able to move the lever down alone with only two or three pushes. The lever must be lowered completely; otherwise the block will be too thick, wasting material and producing a block which may be too thick to use.
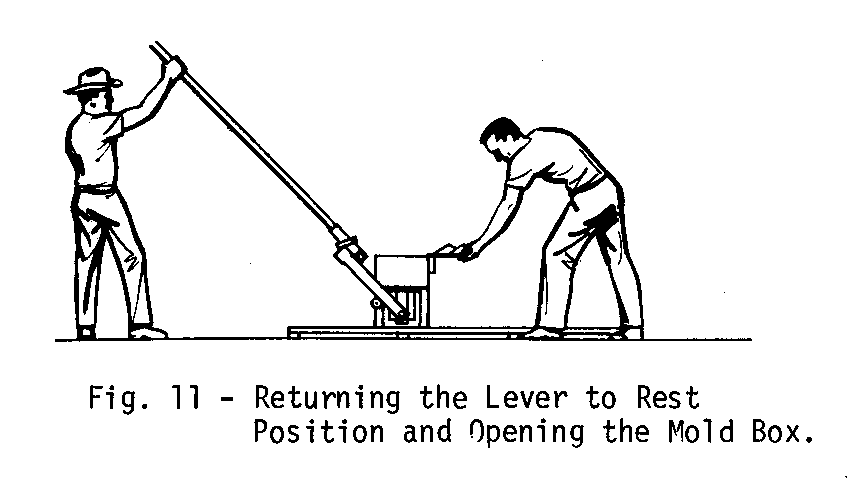
(10) Move the lever to a vertical position, engage the lever latch and return the lever to its rest position on the lower rollers.
(11) Open the cover (see Fig. 11).
(12) Depress the lever steadily to eject the block (see Fig. 12). If the block is cracked or deformed, it
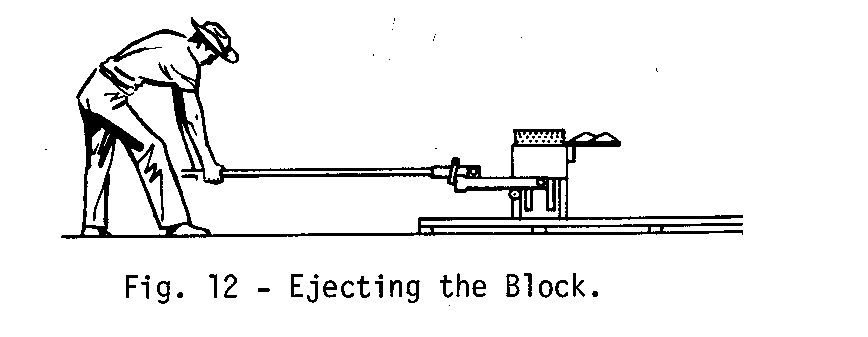
should not be used. Read the instructions in paragraphs 52-61, Adjustments.
(13) If the blocks are lifted from the machine and carried properly and carefully, and if the mixture is correct and the machine is in good adjustment, the blocks will not break easily.
(a) Press in on opposite ends of the block with the fingers closed, the thumbs in close to the fingers, and using part of the palms (see Fig. 13).
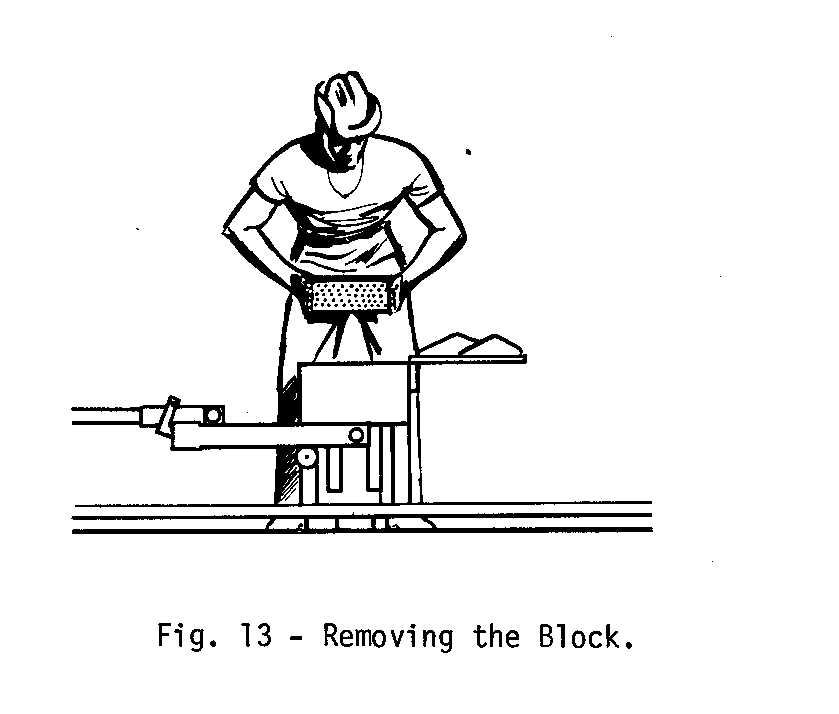
(b) To set the brick down, tip it into place on its side.
46. Try to have at least two men operating the machine, because it is very time-consuming to have one man moving from one side of the machine to the other to press and eject. But it can be done by one man if only one is available. Four persons make an ideal team for pressing: one filling, one pressing, one ejecting, and one removing. A team of four can easily produce two blocks a minute if the mixture is prepared and close by.
47. Sticking Some soils stick more than others. An occasional cleaning of the corners of the press box with a metal scraper may be necessary. The blocks should come out of the press with sharp corners. Sticking can be overcome by slightly moistening the points where it occurs with a bit of kerosene on a rag.
48. Rotating Jobs On a job where there is enough labor to have all the steps -- digging, screening, mixing, loading, pressing, ejecting, and carrying -- going on at the same time, it is fair and good for morale to rotate the jobs every hour or so.
Maintenance and Repairs
49. Lubrication All moving parts and wearing parts (rollers, pins, pressure plate, guide plates, piston cylinder, bearings and supports of axles) should be well lubricated every four to eight hours with heavy oil or grease to insure smooth operation and cut down on wear.
50. Pins The pins which secure the pivot shafts, compression yoke and rollers should be replaced when broken by the largest nails available, because they will last longer than the average cotter pin. If C-ring replacements are not available, broken C-rings can be replaced by wrapping a piece of wire in the groove.
51. Clean Surfaces The inside of the box and the under surface of the cover-must be kept clean.
52. Adjustments The CINVA-Ram press should not be tampered with unnecessarily, but the following suggestions may help if the press produces faulty blocks.
53. Breaks and Cracks Breaks and cracks are caused by loose or incorrectly adjusted guideplates.
54. Side Breaks (See Fig. 14.)
Move the lower adjusting bolts (G and H) sideways toward the high side of the break (see Fig. 1). If more adjustment is needed, move the upper adjusting bolts (E and F) toward the low side of the break. This can sometimes be done simply by hammering the bolt sideways (with a piece of wood, so that the threads will not be damaged) rather than by loosening and tightening the nuts. After the bolts are hammered over, tighten the nuts.
55. End Breaks (See Fig. 15.) Move
the guide plate opposite the end where the break occurs inward by turning lower adjusting bolt G or H, depending on the guide plate to be moved (See Fig. 1). NOTE: Moving one end of a guide plate in one direction forces the other end of the same plate in the opposite direction. If this loosens the piston much at either the top or the bottom of the guide plate, the other end of the plate must be moved inward. The free play should be corrected because it will cause the piston to crack the blocks by compressing them in one direction in the compression cycle (with the upper saddle as the pivot point) and in another direction in the ejection cycle (with the lower rollers as the pivot point). Also, the guide plates must be tight enough against the piston to keep it from jerking and jumping upward at the end of the ejection cycle.
56. If end cracking is not stopped by tightening the plates against the piston, it may be necessary to tilt the guide plates and the piston, so that the pressure plate will be higher at the end which is cracking. This is done by moving the tops of both guide plates toward the cracked end.
57. Corner Breaks A corner break is caused by a combination of a side break and an end break (see Fig. 16).
(1) Fix the side crack by moving the bolts sideways, as in paragraph 54 (usually it is only necessary to move the bottom bolt on the end with the crack toward the side where the crack occurs).
(2) Fix the end crack by moving the lower adjusting bolt opposite the cracking end inward against the piston, as in paragraph 55.
58. Tapering Tapering is caused by incorrectly adjusted guide plates.
59. Side Taper (See Fig. 17.)
First move the guide plate on the thicker side outward; then move the other guide plate inward (see Fig. 1). The guide plates should be kept parallel to each other. Move both the tops and bottoms of both guide plates the same distance.
60. End Taper (See Fig. 18) Move the
tops of both guide plates toward the thin end. Move the bottoms of both guide plates toward the thick end. (See Fig. 1) The tops should be moved as far in one direction as the bottoms are in the other.
61. Corner Taper (See Fig. 19) A
corner taper (one corner thinner than the rest) is caused by a combination of a side taper and an end taper. First, fix the side taper by moving the guide plates as in paragraph 59. Second, fix the end taper by moving the guide plates as in paragraph 60.
62. Curing and Stacking the Blocks The curing of the blocks is another important step which must be taken with care. To become careless at this point could ruin all the careful work that has gone before.
63. The moisture in the blocks must come out slowly and evenly.
64. The blocks should be laid on flat, unwarped, clean planks wide enough to support the full width of the blocks (See Fig. 20)
If such boards are not available, the blocks should be placed on smooth ground covered with paper or leaves so that they will not be in direct contact with the earth
65. The blocks should not be pushed into another position after being placed. If it is necessary to move the blocks at this point when they are very weak, they should be carefully lifted and carefully placed again. If the blocks cannot be put inside or under a shelter, cover them with heavy paper or plastic. (Paper cement bags carefully opened and separated make excellent coverings). If there is a shortage of storage space, the blocks can be stacked five rows high after three or four hours of drying -- if they are very carefully handled.
66. The next day, the first operation is to move the blocks to make room for another day's production.
67. After the overnight drying, the blocks should still be protected from the weather because they must still cure slowly for four or five more days. Soaking will harm the blocks at this stage. Sunshine will make them cure too quickly, reducing their strength. In very hot climates blocks should be kept moist during this period. In any climate they should be prevented from curing too fast. For the first four days they should be sprinkled lightly with water twice a day. A plastic cover is useful to maintain moisture in the pile. If lime is used, double the curing time. The blocks can be restacked ten rows high on edge for the next curing period of 10 days. The blocks must not be stacked solidly; there should be a space of about an inch between blocks to let them cure properly. A good stacking arrangement is three blocks side by side with an inch space between them crossed with three blocks above -- alternating the direction of each layer (See Fig. 21).
68. In carrying out the curing process, try to be moving the blocks closer to the construction site.
69. Never underestimate the importance of careful curing.
70. Variations of Blocks, Floor Tiles The CINVA-Ram box, when used without any inserts, produces a solid block 11-1/2" x 5-1/2" x 3-1/2" (9cm x 14cm x 29cm). Inserts for the box, which are included with the CINVA-Ram will change the size or shape of the blocks.
71. Frog A wooden "frog" (see Fig. 22)
is used in the box to produce a block with a partially hollow core. The advantage of this block is that it uses only four-fifths the mixture used in a regular block -- reducing both cost and labor. These blocks are also ideal for designing patterns in walls using blocks laid on edge. The "frog" must be kept clean.
72. Some soils will stick to the wooden mold. A quick wipe with a kerosene-dampened rag will overcome this.
73. Blocks can be made with hollow cores running the whole length of the block, but this takes a little more time. The proper molds for these blocks have to be made (see Fig. 23);
they do not come with the press. These blocks can be used where metal reinforcing rods are to be run through the laid blocks.
74. With a little experience, operators will become proficient in making these blocks.
75. Floor Tiles Tiles produced with the CINVA-Ram Block Press make inexpensive, attractive and durable flooring. The tile insert is a wooden block with a metal face (see Fig.24).
The wearing surface on the tile is made with a cement mixture.
(1) Screen the sand for this mixture as finely as possible: the finer the sand, the smoother the tile face will be.
(2) Mix two parts sand with one part cement. Mineral coloring can be added to produce different colored tiles.
(3) Mix water with the sand cement mix, as in paragraphs 37-39.
(4) Place the tile-making insert in the box.
(5) Spread the cement mixture over the insert to a depth of one-quarter to three-eights of an inch (6mm - 10mm).
(6) Add the soil-cement mixture to this without completely filling the box. The two mixtures should be equally wet.
(7) The tile is then pressed and ejected in the same way as the blocks. (See paragraphs 45 and 46.
76. A pallet is helpful in carrying the newly pressed tiles. The tiles, which are thinner than the blocks, are more easily damaged in handling. Cured or partly cured blocks can be used as pallets. The tiles are turned over when removed from the machine and cured face up. They can be carried on the insert to the curing spot if pallets are not used, and then inverted when placed down; but this operation is a little awkward and slows the tile making.
77. It is extremely important that the tiles rest on a flat surface for the first day of curing. A bowed surface will make the tile sag to the bow and the tile will either cure in a warped shape or crack.
78. A different method of facing is to place a dry mixture of cement, sand and coloring into the box and then add a soil-cement mixture which is slightly wetter than usual. This saves the time it takes to make a wet mixture. It also spreads out easier on the insert.
79. The tile facing may stick to the insert. Rust on the metal face can cause this. If nothing else stops the sticking, put a sheet of plastic or a piece of heavy paper (one ply of paper cement bag will do) cut or torn to the size of the insert into box before filling. The plastic or paper can be peeled off the face of the pressed tile. One paper will last for about twenty tiles.
80. Curing and Stacking Tiles are cured in the same way as the blocks, but they are stacked only two high, with the faces together.
81. Other inserts provided with the CINVA-Ram Block Press can be used to make I-shaped blocks, blocks for utility conduction, and lintel blocks (for placing door supports).
82. Testing the Blocks The strength of the cured blocks should be tested. Most countries have a university or building products laboratory which can test the blocks.
V. BUILDING
83. Mortar The mortar joints between CINVA-Ram blocks and tiles should be 1/2" (1cm) thick. Since the blocks are 11-1/2" x 5-1/2" x 3-1/2" (9cm x 14cm x 29cm) the building unit is 12" x 6" x 4" (10cm x 15cm x 30cm). In flooring, the 11-1/2" x 5-1/2" (14cm x 29cm) tiles plus the half inch (1cm) mortar joints, make a unit of 12" x 6" (15cm x 30cm).
84. The foundation for the blocks must be firm. Use a cement-sand mortar for the first two layers to allow waterproofing.
85. The mortar recommended for the rest of the building is one part cement, two parts lime and nine parts of the same soil used to make the blocks. Lime is used because it forms a more plastic mortar; since it sets more slowly than cement, it is less likely to crack. The mortar should be a moist mixture which does not flow as freely as cement-sand mortar.
86. Surface Coating Let the mortar dry for about a week. Then, using a narrow brush, paint all the joints with a thin cement wash which can be brushed into any fine cracks. Stir the cement wash frequently. Where large cracks develop they should be gouged out to hold a packing of soil-cement mortar. Wet the crack. Press the mortar in and smooth it off.
87. The blocks alone have an attractive finish but they can also be coated in the following way: after a day, paint all the exterior walls with a cement wash of about rich milk consistency. Work in the shade, keeping the cement wash well stirred. Three coats are recommended. The coats should be thin to keep from building up a crust of cement. Allow a day between each coat.
88. A lime wash can be applied to make the building waterproof. This usually needs to be done again every year.
89. A silicone base wash (clear in appearance) is an excellent water repellent for very rainy areas. In experiments this solution has waterproofed blocks which were not coated with a cement wash. In areas of freezing weather, experimentation should precede the use of CINVA-Ram blocks.
VI. REFERENCES
90. Using Low Cost CINVA-Ram Earth Blocks for Construction in Cold Climates, by Chris Ahrens, U.S. Office of Economic Opportunity, Arlington, Virginia, December 1970.
CINVA-Ram Handbook, by John R. Hansen, volunteer in American Friends Service Committee Summer Project, July 1963, Patzicia, Guatemala.
Earthen Home Construction: A Field and Library Compilation with an Annotated Bibliography, by Lyle A. Wolfskill, Wayne A. Dunla and Bob M. Gallaway, Texas Transportation Institute, A. & M. College of Texas, Bulletin No. 18, March 1962.
Earth for Homes, Ideas and Methods Exchange No. 22, U.S. Housing and Home Finance Agency, 3rd printing, revised September 1963.
VII. OTHER MACHINES FOR MAKING BLOCKS FROM STABILIZED EARTH
91. Landcrete, manufactured by Messrs. Landsborough Findlay (South Africa) Lts., Johannesburg, and Trans-Atlas Ltd., 15 Duke St., Dublin 2, Ireland. A well-designed hand-operated toggle press, sturdily constructed and simple to operate.
92. Winget, manufactured by Messrs. Winget Ltd., Rochester, England. A hydraulic press powered by a gasoline engine. The quality of the blocks produced is helped by high operating pressures, but the production rate is the same as that of a hand-operated machine.
93. Ellson Blockmaster, manufactured by Ellson Equipments (Pty). Ltd., Johannesburg, South Africa. The machine uses a toggle switch lever system giving a constant length stroke which standardizes the thickness of the blocks.
If you need more information on the material in this manual or on other technical matters, VITA (Volunteers in Technical Assistance) can send it to you. If you have specific questions, VITA can put you in contact with an expert who can answer them. VITA is an international association of scientists, engineers, technicians and businessmen who volunteer their spare time to consult on questions from persons in developing areas. Simply send your request to:
VITA 1815 North Lynn Street, Suite 200 Arlington, Virginia 22209 USA
VIII. STRUCTURAL CHARACTERISTICS OF SOIL-CEMENT BUILDING BLOCKS
(Reference: U.S. National Bureau of Standards - Building Materials and Structures Report BMS 78).
Note: The pressurized blocks tested by The National Bureau of Standards were made using a laboratory machine press which produced a block of similar quality to the CINVA-RAM block. Mix: Soil, 50% sand, 50% silt and clay; cement 8%.
General - A high-grade block is superior in many respects to a common burned brick and other usual masonry materials. Even the lowest density CINVA-Ram press block has structural qualities more than sufficient for one and two-storey houses and other small structures.
Compressive Strength - Blocks withstood pressures up to 800 pounds per square inch. When you consider that the load at the foundation line of a one-storey house is only about 30 pounds per square inch, there is a factor of safety of over 20. Adobe blocks seldom withstand more that 100 pounds per square inch.
Transverse Loading (wind load) - A wall made of pressurized blocks withstood a transverse load of 112 pounds per square foot. This will withstand winds of top hurricane strength.
Weather Resistance - The pressurized block wall only leaked through poor mortar joints. The unprotected block surface showed very little erosion under severe surface treatment for low density blocks.
Impact and Concentrated Loading - The preformance of a pressurized block wall under those loadings was superior to many types of masonry walls.
Resistance to Racking - This is the eccentric force on a wall caused by settling of part of a foundation - also the type of force most often encountered in a wall during an earthquake. The test wall of pressurized blocks withstood twice the force applied to a conventional frame wall and over one-third more than the force applied to a cement-block wall.
Fire Resistance - The pressurized soil-cement block is fireproof.
Insulating Quality - The rate of heat passage through a pressurized block wall is about the same as for a solid concrete wall of the same thickness.
CRBP Blocks compared with Adobe and Rammed Earth - A pressurized block of soil-cement such as is produced by the CINVA-RAM Block Press is a comparatively new building product. However, adobe and rammed earth have been used for centuries in building constructions throughout the world. There are many buildings in the U.S. constructed of adobe and rammed earth over 100 years old and still in good condition. The CINVA-Ram press block is far superior in all respects to either adobe or rammed earth as brought out in the Bureau of Standards tests as well as all other comparative tests of records.
ABOUT VITA
Volunteers in Technical Assistance (VITA) is a private, nonprofit, international development organization. It makes available to individuals and groups in developing countries a variety of information and technical resources aimed at fostering self-sufficiency--needs assessment and program development support; by-mail and on-site consulting services; information systems training.
VITA promotes the use of appropriate small-scale technologies, especially in the area of renewable energy. VITA's extensive documentation center and worldwide roster of volunteer technical experts enable it to respond to thousands of technical inquiries each year. It also publishes a quarterly newsletter and a variety of technical manuals and bulletins.
VITA's documentation center is the storehouse for over 40,000 documents related almost exclusively to small- and medium-scale technologies in subjects from agriculture to wind power. This wealth of information has been gathered for almost 25 years as VITA has worked to answer inquiries for technical information from people in the developing world. Many of the documents contained in the Center were developed by VITA's network of technical experts in response to specific inquiries; much of the information is not available elsewhere. For this reason, VITA wishes to make this information available to the public.
For more information, contact VITA, P.O. Box 12438, Arlington, Virginia 22209, USA.
"Ode to a CINVA-Ram Block-making Machine"
I'll sing you the song of a CINVA: A simple portable thing. Earth pressing -- no messing! A fabulous blessing When it comes to house construction.
Shovel earth into the mold box, Then cover and give a big heave. In compacting it's acting, The pressure reacting: Eject, and the brick is achieved.
I'll sing of a brand-new CINVA: It calls us to start the day. At dawning we're yawning But the bricks, they are spawning, And that has the biggest say!
So wherever you are in the wilds Frustrated by lack of success, A CINVA is soothing, So useful it's proving, Your project is bound to impress!
John Miles International Voluntary Service (British Branch of Service Civil Internationale) Suihari, Dinajpur, EAST PAKISTAN