ABOUT VITA
Volunteers in Technical Assistance (VITA) is a private, non-profit, international development organization. VITA makes available to individuals and groups in developing countries a variety of information and technical resources aimed at fostering self sufficiency--needs assessment and program development support, by-mail and on-site consulting services; information systems training; and management of long-term field projects. VITA promotes the application of simple, inexpensive technologies to solve problems and create opportunities in developing countries.
VITA places special emphasis on the areas of agriculture and food processing, renewable energy applications, water supply and sanitation, housing and construction, and small business development. VITA's activities are facilitated by the active involvement of VITA Volunteer technical experts from around the world and by its documentation center containing specialized technical material of interest to people in developing countries.
VITA VOLUNTEERS IN TECHNICAL ASSISTANCE
ISBN 0-86619-025-2
Published by VITA 1600 Wilson Boulevard, Suite 500 Arlington, Virginia 22209 USA Tel: 703/276-1800 . Fax: 703/243-1865 Internet: pr-info@vita.org
I. WHAT IT IS AND HOW IT IS USEFUL
II. DECISION FACTORS
- Applications Advantages Considerations Cost Estimate
III. MAKING THE DECISION AND FOLLOWING THROUGH
IV. PRE-CONSTRUCTION DECISIONS
- The Process The Thermosyphon Principle The Thermosyphon Principle at Work Deciding Quantity Site Selection
V. CONSTRUCTION NEEDS
- Tools Materials
VI. CONSTRUCTION
- The Collector
- The Collector - Flat Galvanized Metal Sheets
- The Collector--Corrugated Metal Sheets
- Make the Storage Tank
- Make the Collector Stand and Storage Platform
- Connect the Tank and Collector
VII. OPERATION AND MAINTENANCE
VIII. CONVERSION TABLES
IX. DICTIONARY OF TERMS
X. FURTHER
APPENDIX I. DECISION MAKING WORKSHEET
APPENDIX II. RECORD KEEPING WORKSHEET
- Solar Water Heater
I. WHAT IT IS AND HOW IT IS USEFUL
Hot water is not always necessary, and in warm climates it may be relatively easy to do without. It is, however, more effective than cold water for many purposes. Even so, in some areas hot water is not used because fuel is so expensive it is used only for essential tasks. A solar heater can supply needed hot water without using up available fuel.
Solar water heaters represent one of the easiest, most practical applications of solar energy on an individual and small-scale basis.
Heat from the sun's rays is easily captured. Black-painted surfaces exposed to the sun will get hotter than those of any other color. A metal surface painted flat black and placed in contact with water will heat the water. The black metal plate is called an absorber.
Once the water is heated, it is kept hot with insulation. The heated water behind the absorber can be insulated with a variety of substances such as fiberglass, straw, sawdust, hair, or polyurethane foam. In some absorber designs a sheet of glass is placed between the absorber plate and the sun. Glass transmits the high radiation from the sun that heats the water, but stops the low-energy infrared radiation that is reradiated from the hot absorber. It also keeps air from passing over the absorber causing heat loss. The reduction of the two forms of heat loss makes glass an ideal insulator. Clear plastics can be used but their life expectancy is limited.
The solar water heater presented here (see Figure 1 ) can provide hot water the year round.
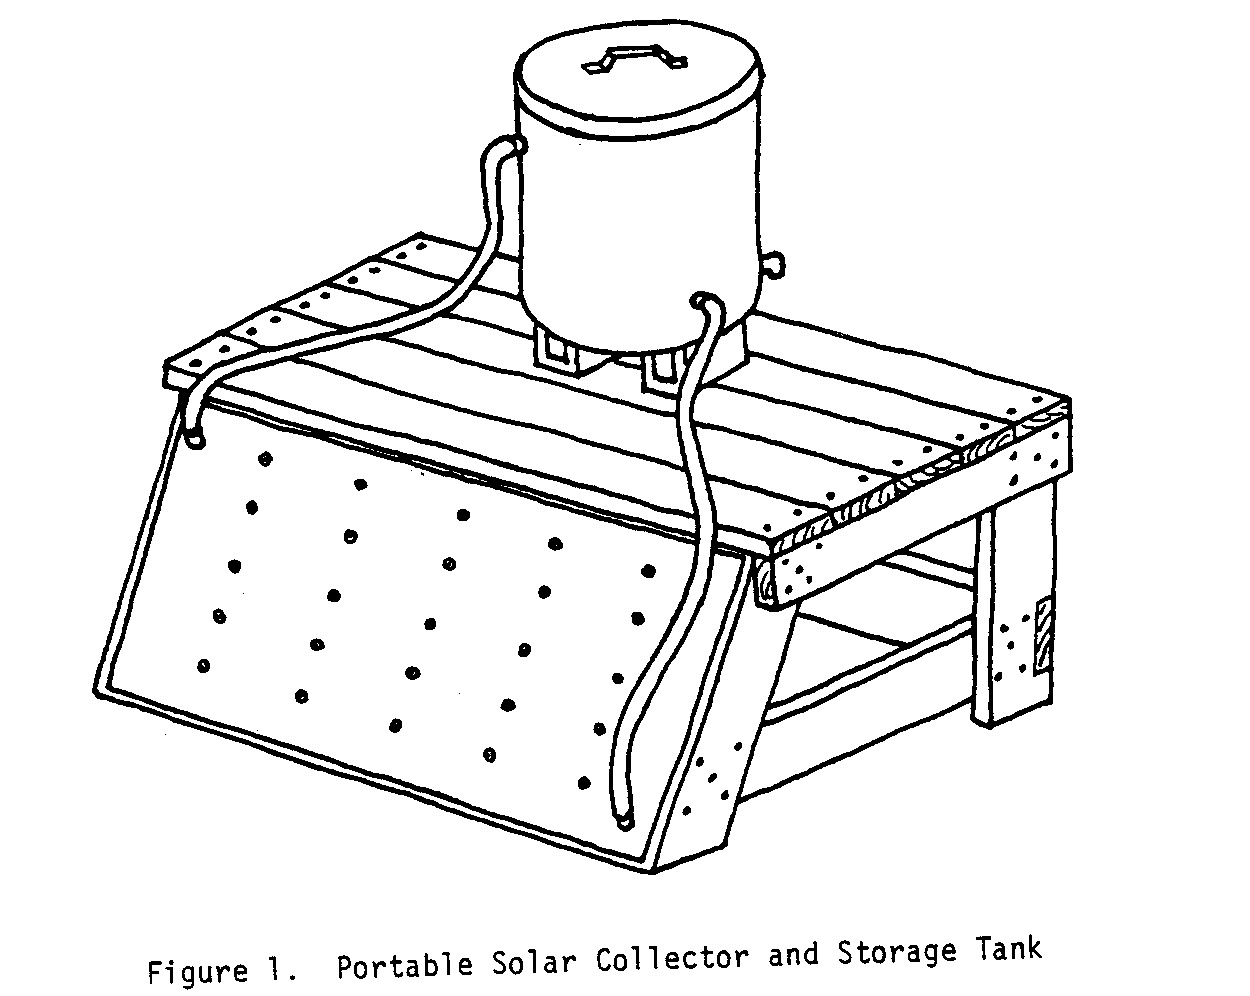
This system will heat 70 liters (18-1/2 gallons) of water to 60 [degrees]C (140 [degrees]F) between sunrise and noon on a clear day with an average outside temperature of 32 [degrees]C (90 [degrees]F). Obviously, water does not have to be this hot for many purposes: very hot water can be mixed with cool water to provide water warm enough for bathing and washing clothes and dishes. This factor should be taken into account when estimating the amount of water needed each day.
Building a solar water heater can be a good project for a school class:
* The heater, assuming access to the right equipment, is not difficult to build.
* It provides a working demonstration of the principles of solar technology.
* Students introduced to solar technology and its potential are familiarized with energy-conserving, non-polluting technologies.
II. DECISION FACTORS
Applications: * Heating water.
* Washing clothes.
* Personal hygiene.
Advantages: * Easy to build and operate.
* Provides heated water 60 [degrees]C (140 [degrees]F) within a two-hour period.
* Portable.
* No fuel costs.
Considerations: * Has to be filled manually.
* Life expectancy of two years.
* Heats water only on sunny days. Does not operate at night.
COST ESTIMATE(*)
$30-$70 (US) including materials and labor.
* Cost estimates serve only as a guide and will vary from country to country.
III. MAKING THE DECISION AND FOLLOWING THROUGH
When determining whether a project is worth the time, effort, and expense involved, consider social, cultural, and environmental factors as well as economic ones. What is the purpose of the effort? Who will benefit most? What will the consequences be if the effort is successful? Or, if it fails?
Having made an informed technology choice, it is important to keep good records. It is helpful from the beginning to keep data on needs, site selection, resource availability, construction progress, labor and materials costs, test findings, etc. The information may prove an important reference if existing plans and methods need to be altered. It can be helpful in pinpointing "what went wrong." And, of course, it is important to share data with other people.
The technologies presented in this series have been tested carefully, and are actually used in many parts of the world. However, extensive and controlled field tests have not been conducted for many of them, even some of the most common ones. Even though we know that these technologies work well in some situations, it is important to gather specific information on why they perform properly in one place and not in another.
Well documented models of field activities provide important information for the development worker. It is obviously important for a development worker in Colombia to have the technical design for a kiln built and used in Senegal. But it is even more important to have a full narrative about the kiln that provides details on materials, labor, design changes, and so forth. This model can provide a useful frame of reference.
A reliable bank of such field information is now growing. It exists to help spread the word about these and other technologies, lessening the dependence of the developing world on expensive and finite energy resources.
A practical record keeping format can be found in Appendix II.
IV. PRE-CONSTRUCTION DECISIONS
THE PROCESS
The solar water heater presented here (see Figure 2) was
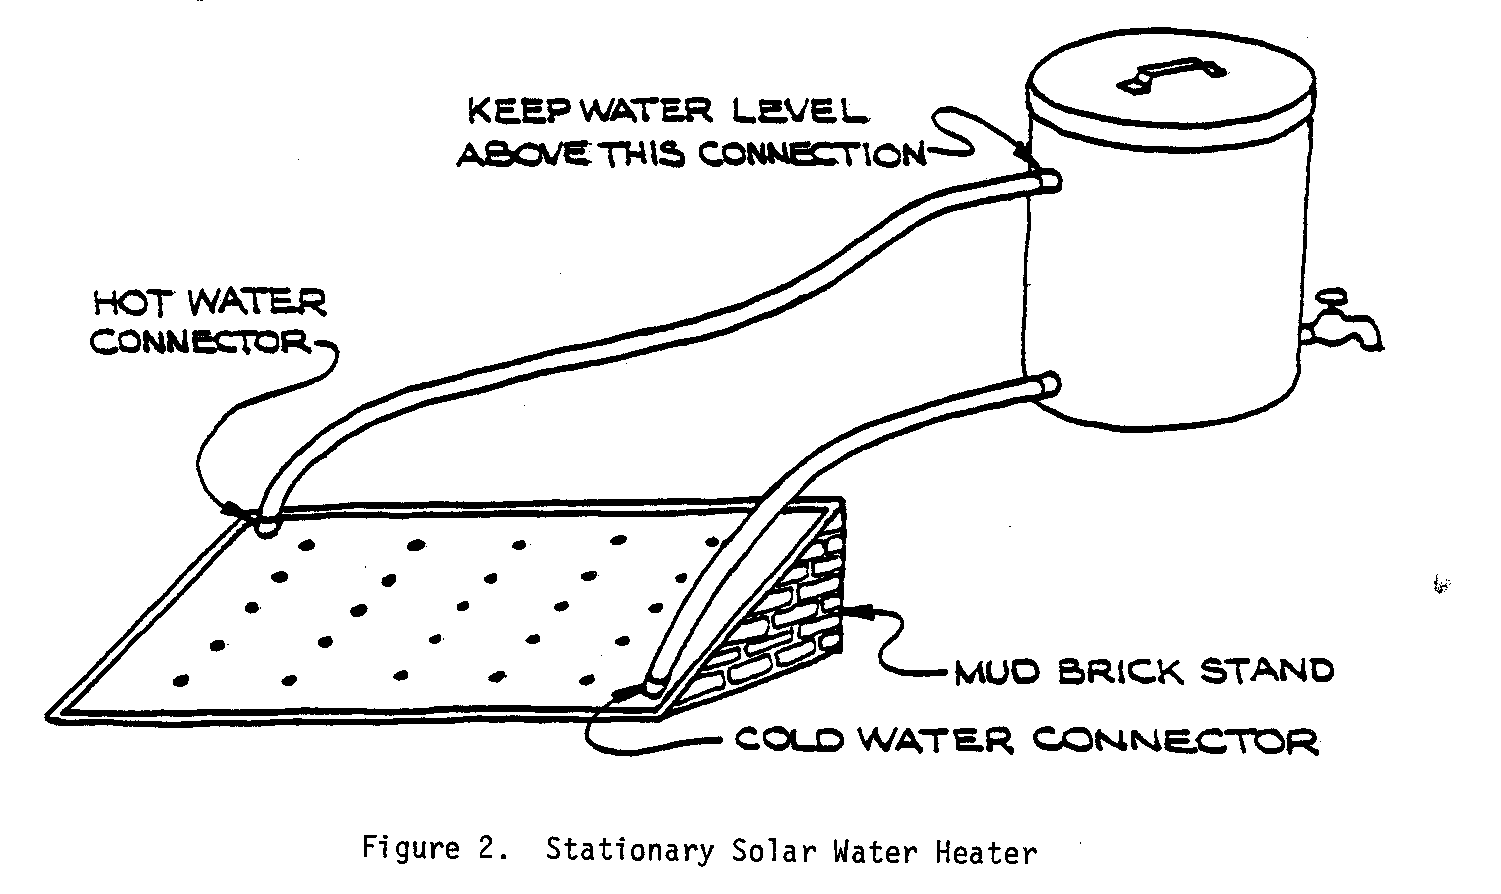
designed, developed, and tested in Afghanistan in the late 1960's. Since that time, this heater has been built and used by development workers around the world.
There are two main parts to the solar water heater: (1) a heat-absorbing collector (absorber) that is rather like an envelope made of metal sheets; and (2) a storage tank that holds the water for the system. The collector can be made either of flat galvanized metal sheets or corrugated galvanized metal sheets. Instructions are included for both types of materials.
THE THERMOSYPHON PRINCIPLE
* The tank, filled with water, is connected to the collector.
* The collector is positioned below the bottom of the tank.
* Water runs through a hose at the bottom of the tank to the collector.
* The water is heated in the collector.
* Hotter water flows toward the top of the collector.
* Hot water is forced out of the hose at the top of the collector into the tank by the pressure of the cooler (heavier) water coming in from the tank.
* The hotter water stays at the top of the tank and cooler water flows to the collector. The flow established continues until the water is no longer being heated by the sun. For example, at night the flow becomes stable and the hot water remains until it is used or it cools.
THE THERMOSYPHON PRINCIPLE AT WORK
It is important to remember that the storage tank must be located 46cm (18") or higher above the collector to enable the thermosyphon principle to work (see Figure 3).
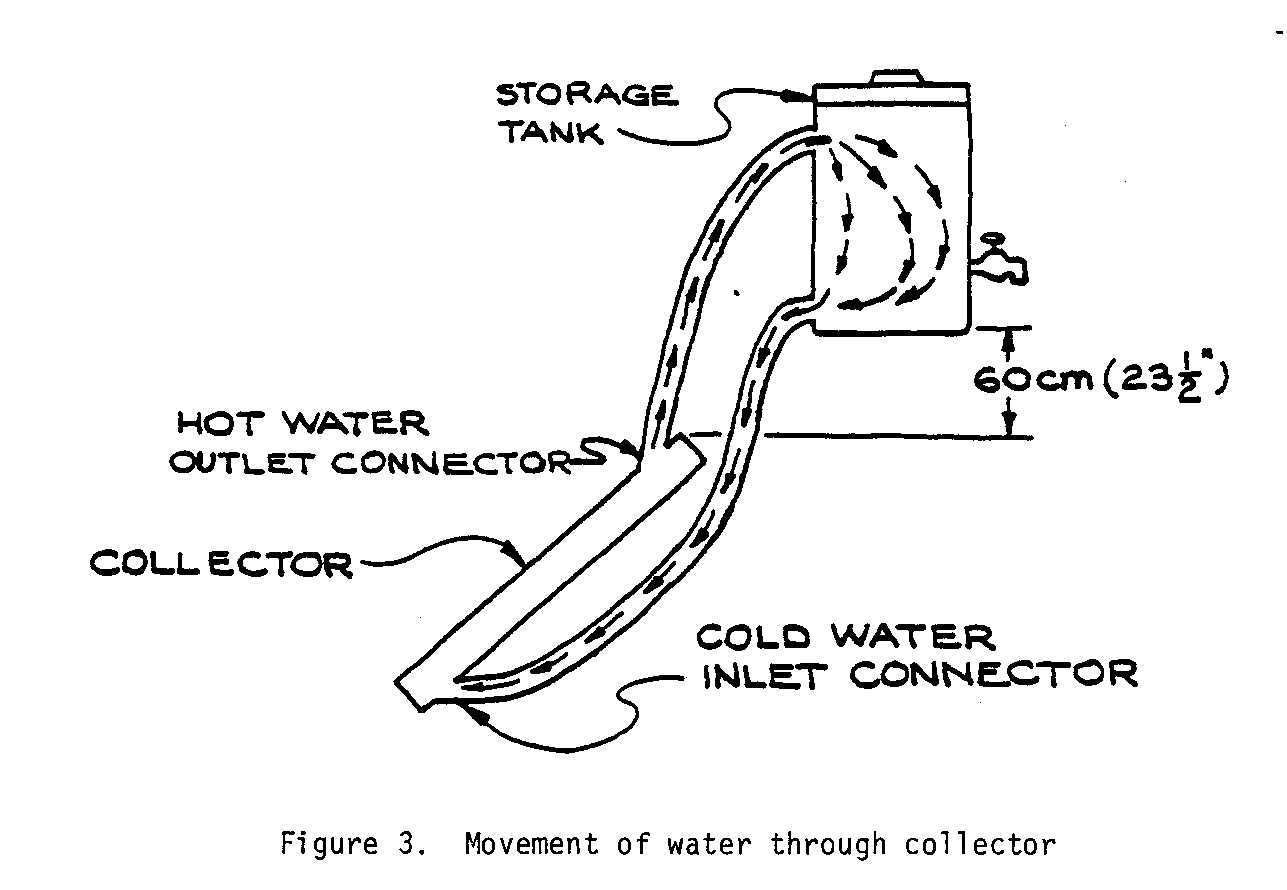
If you cannot place this water tank above the collector, a pump will be needed to move the water from the collector to the tank, and that will increase expenses.
DECIDING QUANTITY
The quantity of water to be heated is a primary concern. Most Americans use, on the average, 95 liters (25 gallons) per person per day. However, for a lifestyle which does not include a hot shower or bath each day and an automatic clothes washer, the quantity of water needed is much less. In many areas, 38 to 45-1/2 liters (10 to 12 gallons) per person per day is adequate. In others, people often are required by circumstances to "make do" with 7-12 liters (2-3 gallons) of water per day. Water, in such areas, is so precious even in very small amounts that whether or not it is hot is of no great importance at all. (For these areas, a solar distillation unit might be an important technology to introduce.)
If the water heater is needed for a small infirmary or a school, make an estimate of the number of gallons required for each person and for each purpose. The storage tank may need to be made larger, depending upon this need. Collector size must also be considered--it directly relates to the quantity of hot water desired. A good general rule is one square meter (39-1/2" square) of collector area for 41-1/2 liters (11 gallons) of hot water desired. In colder climates, one square meter (39-1/2" square) of collector area may yield only 30 liters (about 8 gallons) per square meter.
SITE SELECTION
Site conditions are important. Collectors should face directly south. Turning a collector southeast or southwest can affect its performance by about 20% or more. If hot water is needed by noon, face the collector to the southeast; if hot water is more important in late afternoon, face the collector to the southwest (see Figure 4).
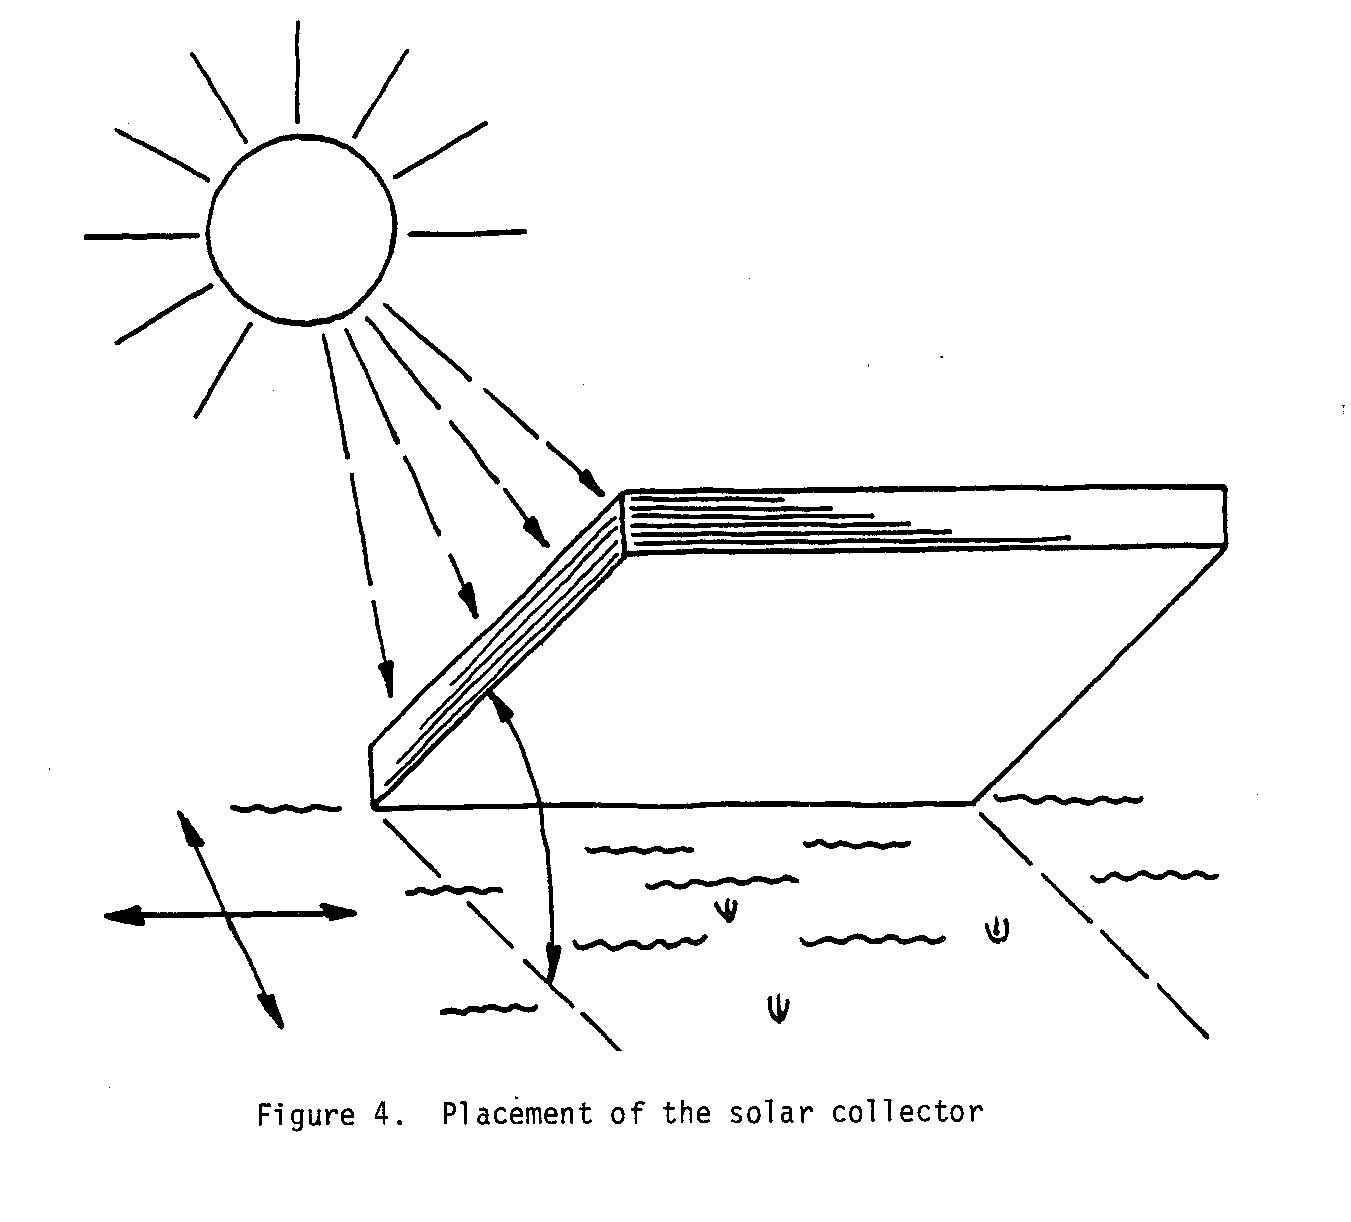
The site should be free from shade. Collectors should be placed so that they can be tilted from the horizon to an angle equal to the latitude of the location. (In more temperate climates the angle should equal the latitude plus 10[degrees]. If the latitude is unknown, the collector can be placed at a 45[degrees] angle, except in areas near the equator). The latitude for your area can be obtained from an atlas or globe.
V. CONSTRUCTION NEEDS
Materials and tools needed for a 90cm X 180cm (35-1/2" X 71") absorber/collector and a 70-liter (18-1/2 gallon) storage tank are listed below.
TOOLS
* Metalworking tools: hammer, anvil, soldering equipment, tinsnips
* Screwdriver
* Drill and 6mm (1/4") drill bit
* Pliers or 6mm (1/4") wrench
MATERIALS
For Flat Sheet Metal Collector
* Galvanized sheet metal: 2 pieces, 90cm X 180cm (35-1/2" X 71") [absorber/collector]
* Galvanized sheet metal pipe: 2 pieces, 2.5cm diam. X 5cm long (1" X 2")
* Galvanized stove bolts: 28, 6mm diam. X 2.5cm long (1/4" X 1")
* Metal washers: 56, to fit 6mm (1/4") bolts
- Rubber washers: 56, to fit 6mm (1/4") bolts. Inside diam. 3.5mm (1/8"); outside diam. 2cm (3/4"). These can be cut from heavy truck tire inner tubes.
For Corrugated Metal Collector
* Corrugated metal sheet [galvanized], 122cm X 244cm (48" X 96")
* Galvanized sheet metal pipe: 2 pieces, 1.25cm diam. X 5cm long (1/2" X 2")
* Galvanized stove bolts: 80, 6mm diam. X 2.5cm long (1/4" X 1")
* Metal washers: 160, to fit 6mm (1/4") bolts
- Rubber washers: 400, to fit 6mm (1/4") bolts. Inside diam. 3.5mm (1/8"); outside diam. 2cm (3/4")--can be cut from heavy truck tire inner tubes
- Reducer connections: two, to connect 1.25cm (1/2") pipe to 2.5cm (1") hose
Note: Nuts, bolts, washers quantity will vary. Some sheets have corrugations spaced more closely than others. A metal sheet with very closely spaced corrugations will require more fasteners. The figures given here for the corrugated metal collector are approximate amounts.
For Either Kind of Metal Sheet
* Rubber hose: 2 pieces, 2.5cm (1") diam. [long enough to connect collector to tank]
* Galvanized sheet metal tank:(*) 70-liter (18-1/2 gallon) capacity with faucet, removable lid, and 2.5cm (1") hose connectors (one placed two-thirds from the bottom and one placed at the bottom)
* Paint: 1 liter (approximately 1 quart), flat black or homemade mixture of linseed oil and carbon black (charcoal powder)
* Quantity of mud bricks, straw or other suitable material (for insulation of absorber and storage tank)
(*) The best tanks are glass-lined steel tanks or conventional insulated water heater tanks. Obviously, these are unobtainable in many areas. One suitable alternative is a 113.5-liter (30-gallon) drum; it must be painted with rustproof paint or lined with plastic. Another alternative is to have a blacksmith build a tank for the project. In most areas, the local blacksmith's shop would be able to put together such a tank quickly. Be sure it is watertight.
VI. CONSTRUCTION
THE COLLECTOR--FLAT GALVANIZED METAL SHEETS
* Cut 2cm (3/4") off the length and width of one of the sheets of galvanized steel, so that it will be 1cm (1/3") smaller than the other sheet on all four sides (see Figure 5).
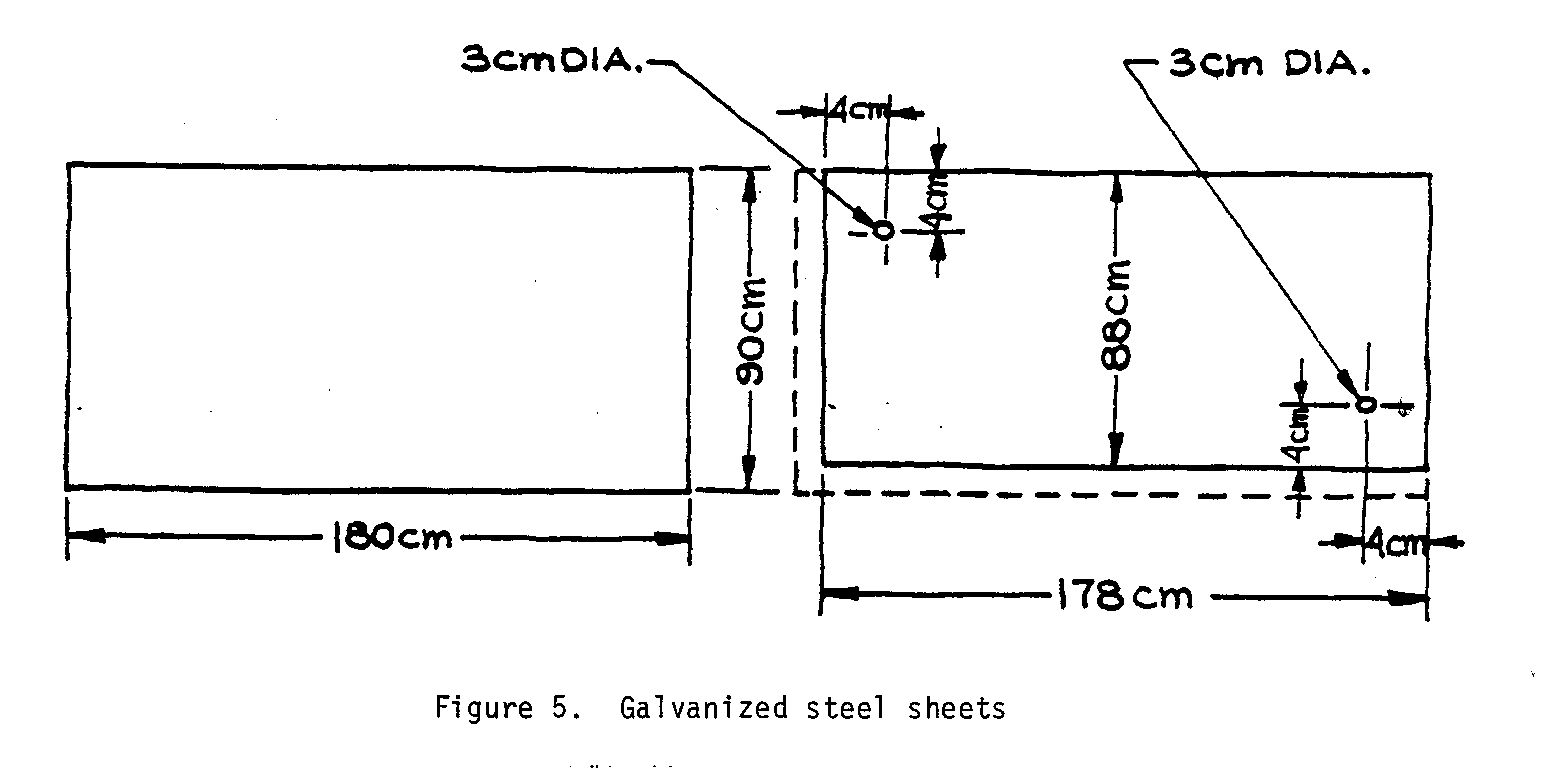
* On the smaller sheet, drill two 3cm (1-1/4") holes for the two connectors. Drill 4cm (1-1/2") in from the edges (see Figure 5).
* Place the two galvanized sheets together. Using a hammer and anvil, fold the 1cm (3/8") overlapping edges (see Figure 6).

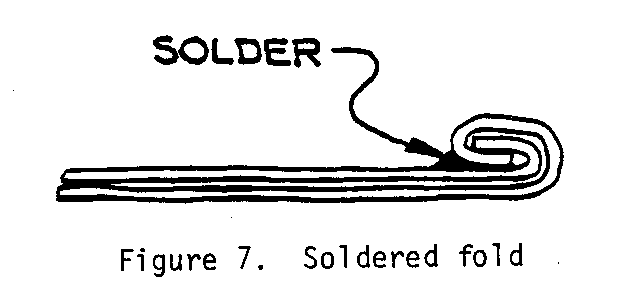
* Fold the edges 1cm (3/8") again and solder them to make an airtight seal (see Figure 7).
* Drill holes for 6mm (1/4") bolts at regular intervals, like buttons on a mattress (see Figure 8). Bolts will keep the
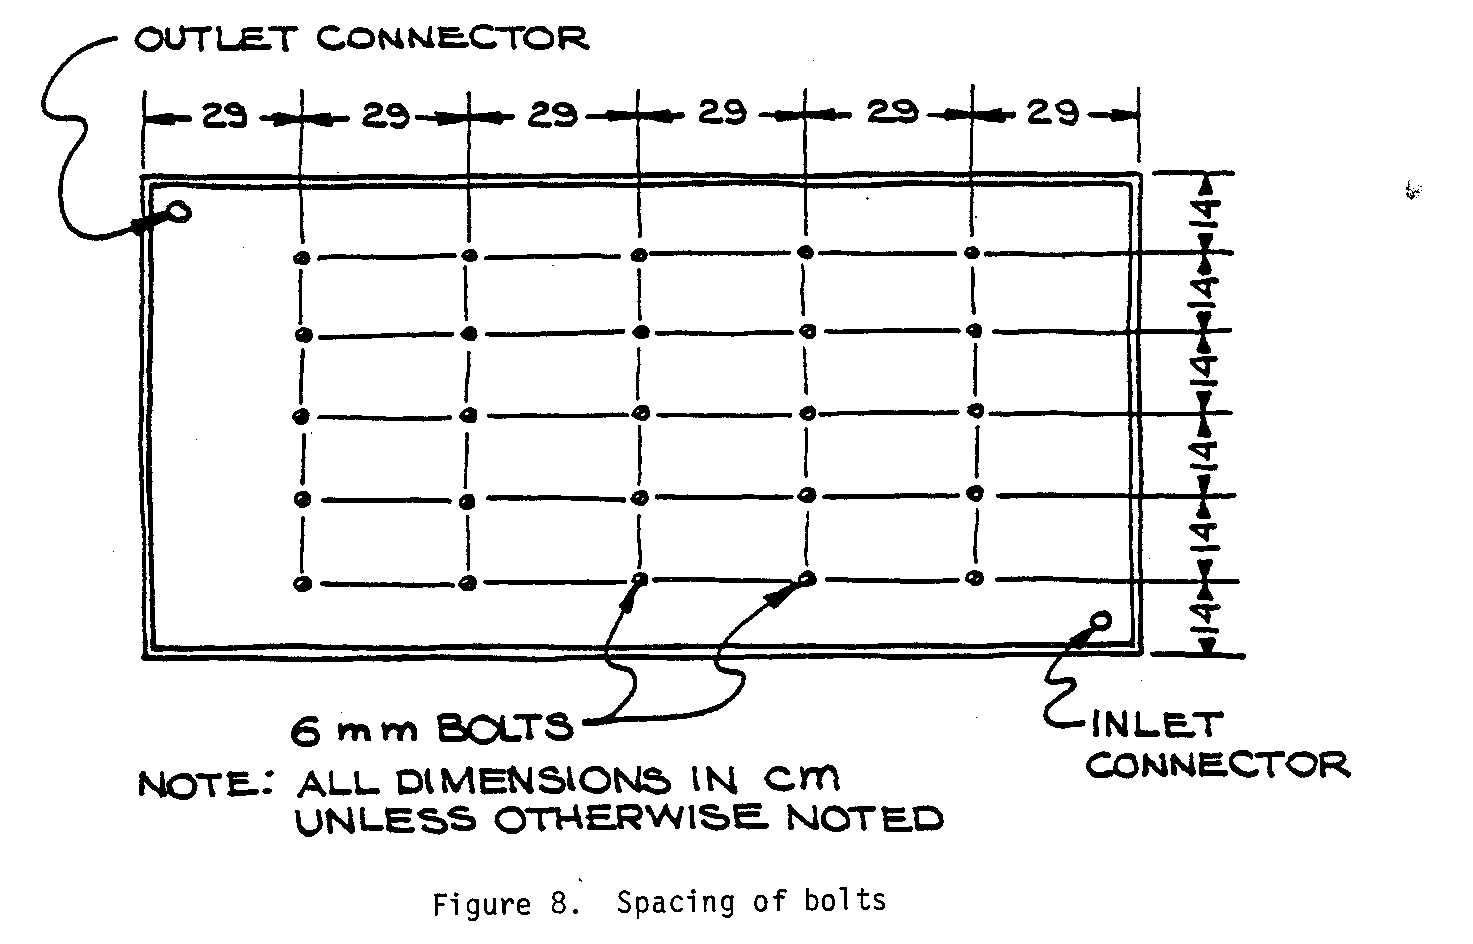
sheets from being forced apart when the absorber is filled with water.
* Place bolts in holes with rubber and metal washers at each end of the bolts to ensure a watertight seal (see Figures 9 and 10)

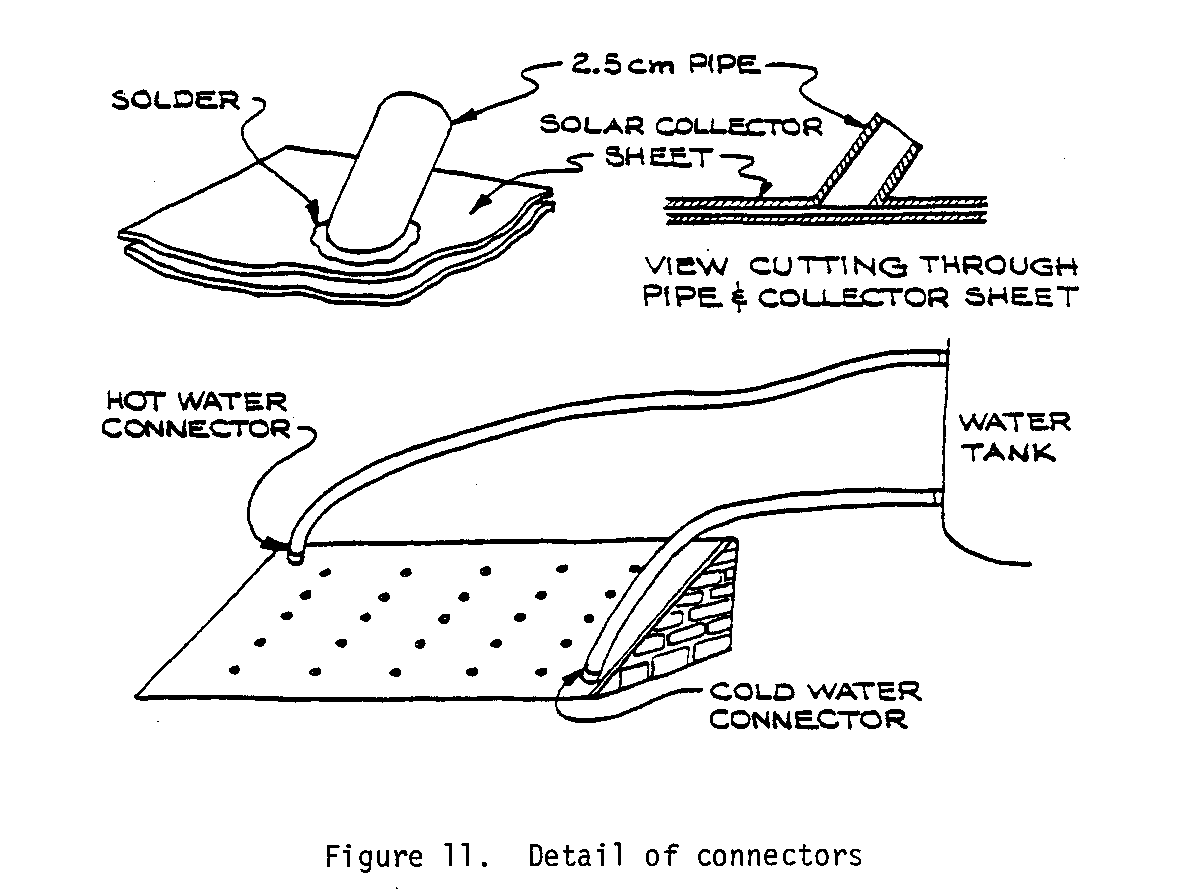
* Use the 2.5cm X 5cm (1" X 2") galvanized sheet metal pipe to make the connectors. Place the pipe flush with the solar collector sheet, covering the 3cm (1-1/4") hole. Solder the pipe to the sheet (see Figure 11).

* Paint the front of the heater with black paint so that it will absorb the sunlight rather than reflect it.
THE COLLECTOR--CORRUGATED METAL SHEETS
* Take two corrugated sheets 122cm X 244cm (48" X 96") and cut 32cm (12-1/2") off the width of both sheets and 64cm (25") off the length of both sheets. Save the scrap metal.
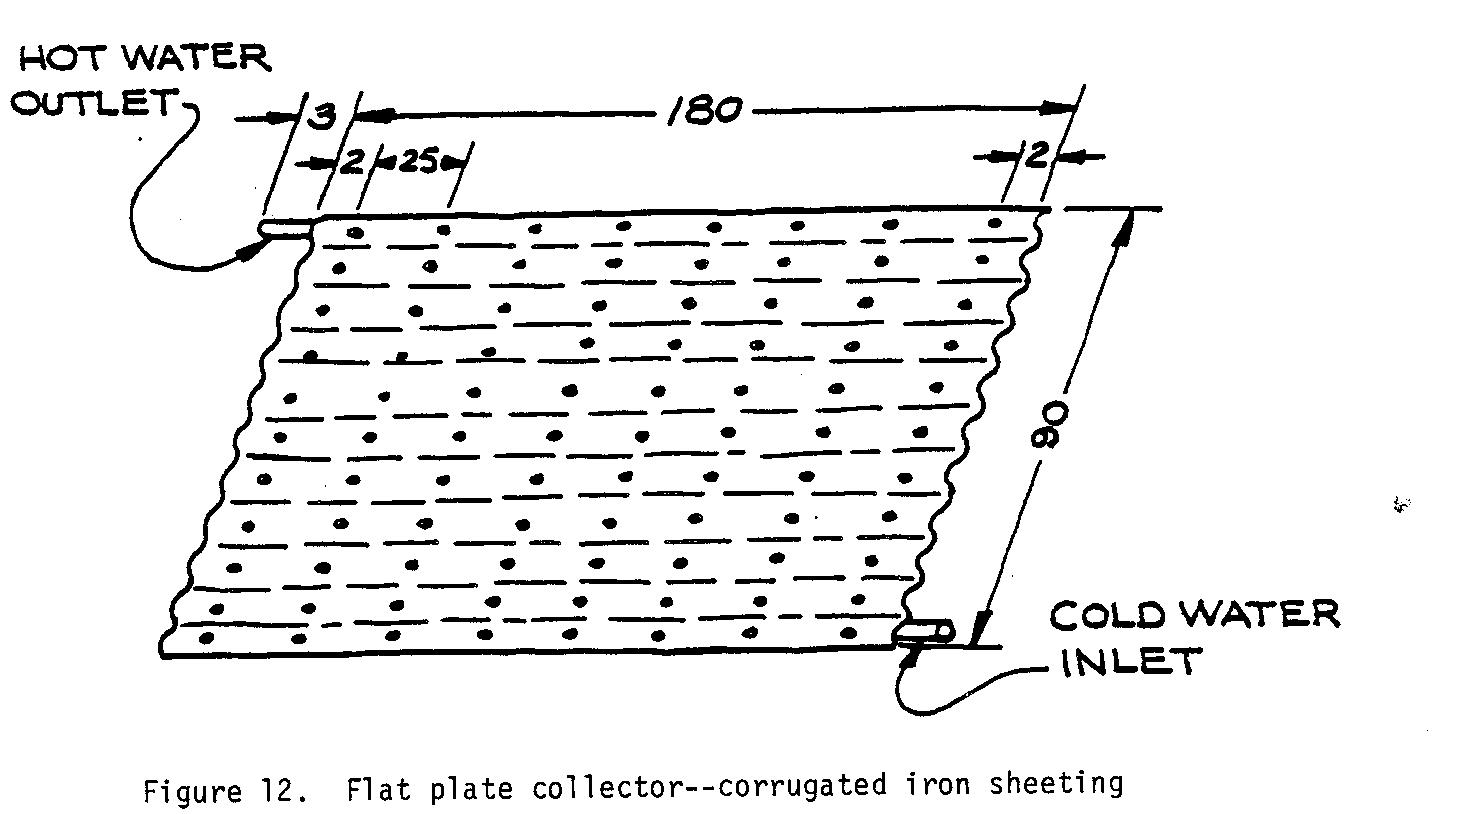
* Place the two sheets together and drill 6mm (1/4") holes 25cm (about 10") apart in alternate corrugations (raised sections), see Figure 12.
* Place 6mm X 2.5cm (1/4" X 1") bolts in holes with metal washer and rubber washer. Separate the two sheets. Place three or four rubber washers on bottom of each bolt so that there is approximately 6mm (1/4") space between the two sheets (see Figure 13).
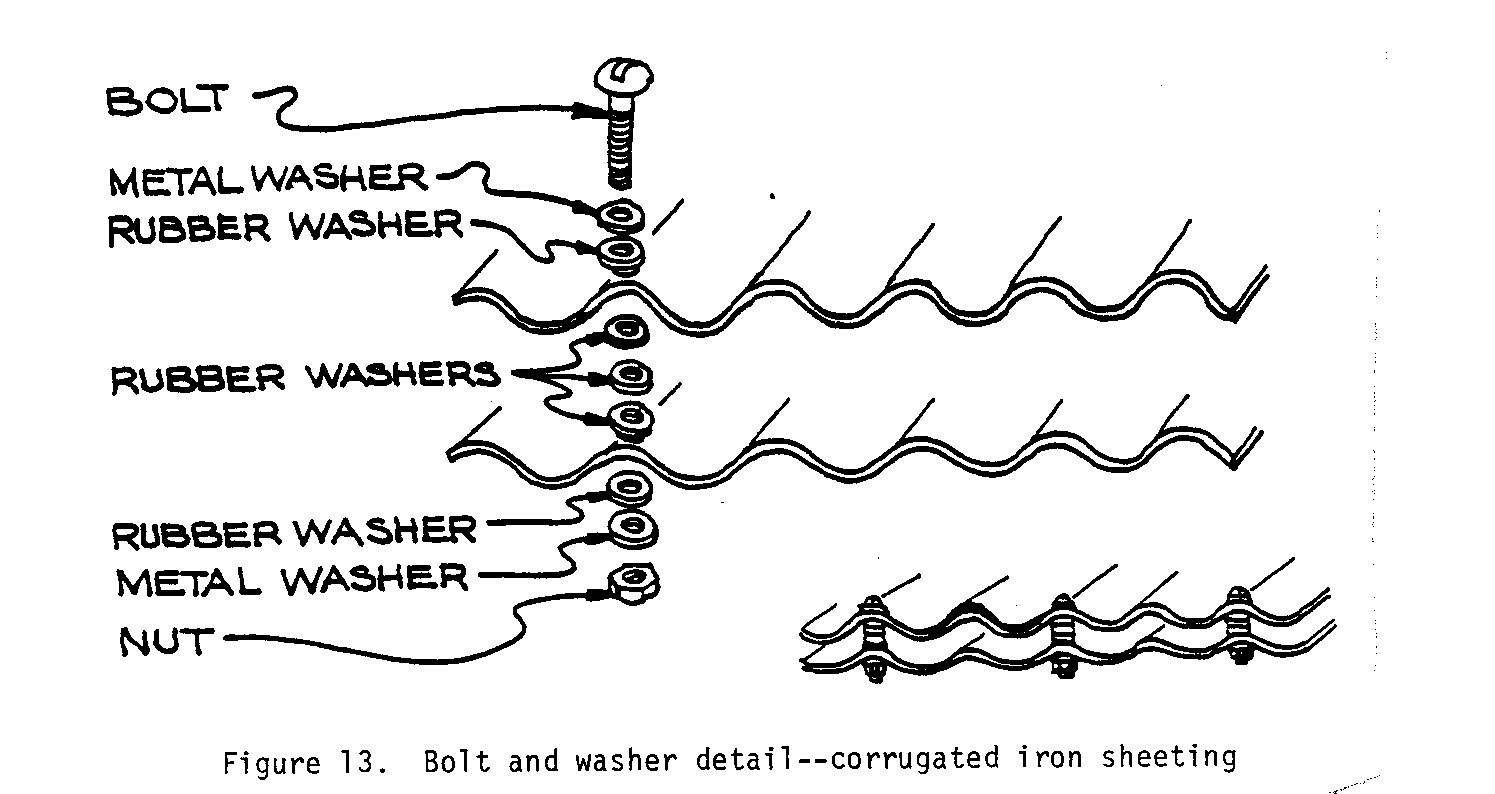
* Attach bolts on undersides of bottom corrugated sheet with rubber washer, metal washer, and 6mm (1/4") nut. Tighten until rubber washer begins to spread.
* Cut scrap corrugated sheet into strips to fit corrugations on each edge of the collector. Bend outside edges over as shown in Figure 14. This should seal the entire edge when complete.
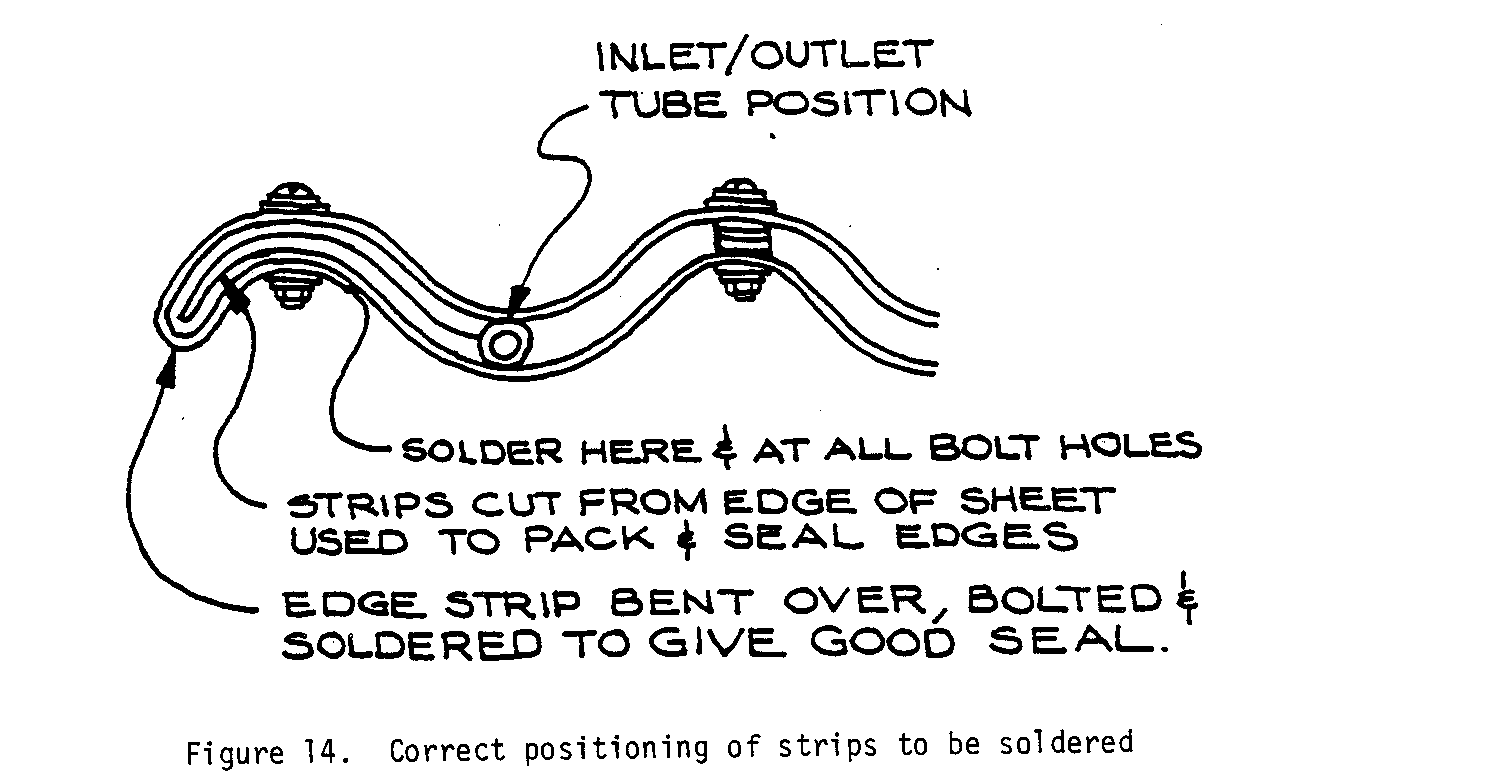
A hammer and anvil can be used to form the strips so they will fit the edge.
* Drill 6mm (1/4") holes 2.5cm (1") apart along the outside edges and at every other corrugation on side edges.
* Fasten edges together with 6mm X 2.5cm (1/4" X 1") bolts, metal washer, and nuts.
* Install water inlet pipe (1.25cm X 5cm [1/2" X 2"l) in bottom right edge.
* Install water outlet pipe (1.25cm X 5cm [1/2" X 2"]) in top left edge.
* Solder all outside edges including bolt holes. Solder around inlet and outlet pipes.
* Attach reducer connections to the inlet and outlet connections.
* Paint front side of collector flat black to absorb sunlight.
MAKE THE STORAGE TANK
A 114-liter (30-gallon) drum can be used for the storage tank, or a 70-liter (19-gallon) tank can be made from galvanized sheet metal. If using an oil drum, make sure that one end can be lifted off to serve as a lid. Also, be certain the drum is thoroughly clean.
* Paint the inside with waterproof paint, or line with plastic. One large piece of plastic draped over the top edge of the tank will work fine.
* Insulate outside by covering with mud, a mixture of tar and straw or sawdust, etc.
* Drill holes for inlet and outlet connectors and solder pipe in place. Holes should be located, for best results, at the bottom of the tank (inlet to the collector) and about two-thirds up the side of the tank from the bottom (outlet from the collector to the tank). If possible, tank should be fitted with a faucet on the bottom, opposite the cold water outlet.
MAKE THE COLLECTOR STAND AND STORAGE PLATFORM
* Place so that the face of the collector faces south and is at a 45[degrees] angle.
* Build a fixed stand. A simple way to raise the absorber is to build up the back and the sloping sides with mud brick. Prop up the back with small boards while the bricks are being laid. Once the bricks are laid, remove the boards and seal any openings or holes with mud. This will form a dead air space which will serve as insulation.
- Or build a portable stand. (A portable stand is usually cheaper and is easily moved to track the sun.) Substitute a wooden frame for the mud brick platform. Put insulating material such as straw or hair directly behind the absorber as shown in Figure 15.
CONNECT TANK AND COLLECTOR
* Attach a section of hose to the lower outlet (cold water) on the tank and attach it to the lower right (cold water) inlet on the collector.
* Attach the other section of hose to the upper inlet (hot water) on the tank and attach it to the upper left (hot water) outlet on the collector.
Note: If using corrugated sheets, make the inside dimensions of the frame 90 cm X 180cm.
Figure 16A and Figure 16B are two possible solar collector/tank
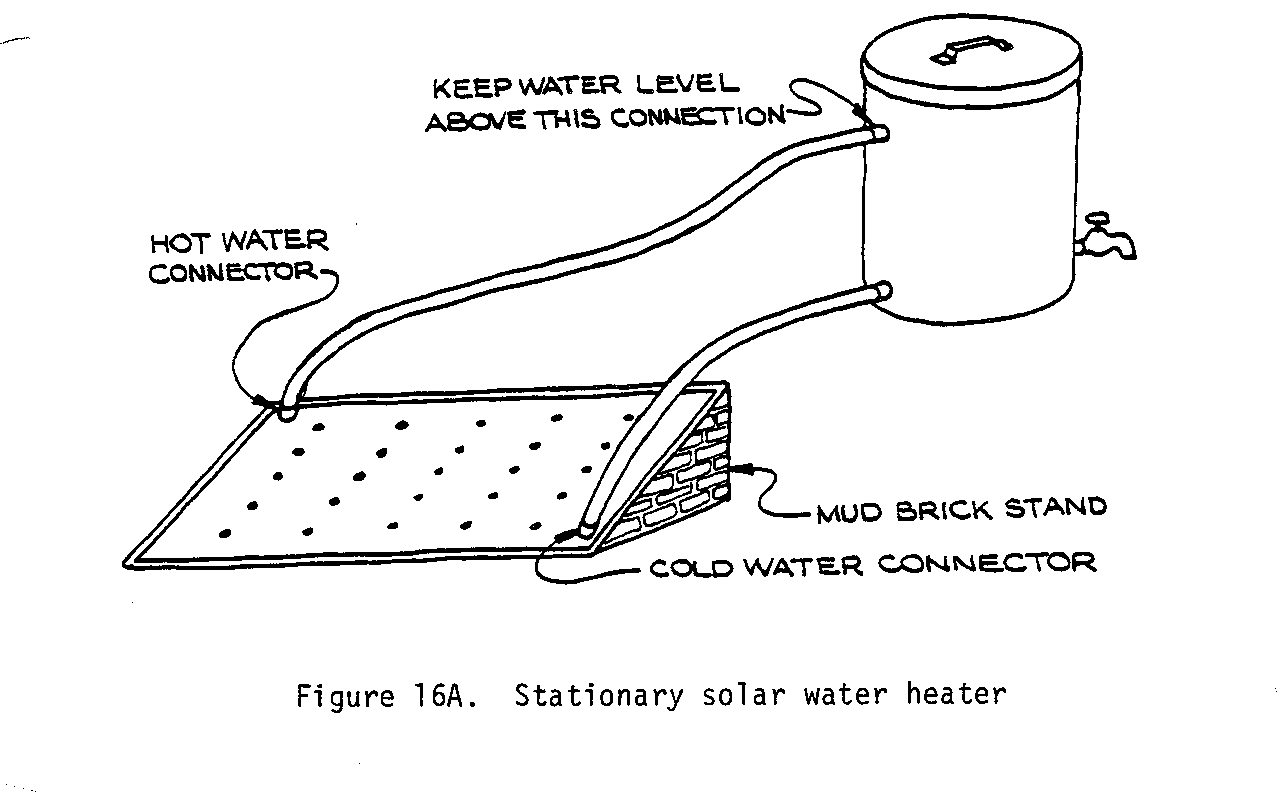
Note: Both systems are placed so that the tops of the collectors are 46cm (18") below the bottom of the storage tanks.
VII. OPERATION AND MAINTENANCE
* Remember to keep the collector at a 45[degrees] angle if the latitude of your area is unknown. Latitude plus 100 in temperate zones.
* The hot water will rise to the top of the tank. When all of the water is to be used, it can be drained from the faucet; when only a small amount of water is needed, the hottest water can be taken from the top of the tank.
* Whenever water is being heated, the water level should be kept above the tank's upper hose connector to allow the water to circulate or the thermosyphon system will not work.
* The water heater works best when the connecting hoses are as short as possible.
This solar water system is virtually maintenance free. Rubber hoses may have to be replaced every two or three years. if metal other than galvanized sheet metal is used, such as untreated sheet metal, the lifespan of the system will be shortened considerably due to rust. Once the collector starts to rust, it must be replaced.
Untreated sheet metal can be painted with several coats of rustproof paint if it can be obtained. However, you should check the painted area in six months to make sure it is not peeling off. It is also helpful to wrap the tank in insulation materials.
If a 113-liter (30-gallon) drum is used, and lined with plastic, the plastic liner will have to be checked regularly and may have to be replaced from time to time depending on the mineral content of the water supply.
To begin using the solar water heater, make certain the tank is 46cm above the top of the collector. Fill the tank with clean water. Check for leaks.
VIII. CONVERSION TABLES
UNITS OF LENGTH
1 Mile = 1760 Yards = 5280 Feet 1 Kilometer = 1000 Meters = 0.6214 Mile 1 Mile = 1.607 Kilometers 1 Foot = 0.3048 Meter 1 Meter = 3.2808 Feet = 39.37 Inches 1 Inch = 2.54 Centimeters 1 Centimeter = 0.3937 Inches
UNITS OF AREA
1 Square Mile = 640 Acres = 2.5899 Square Kilometers 1 Square Kilometer = 1,000,000 Square Meters = 0.3861 Square Mile 1 Acre = 43,560 Square Feet 1 Square Foot = 144 Square Inches = 0.0929 Square Meter 1 Square Inch = 6.452 Square Centimeters 1 Square Meter = 10.764 Square Feet 1 Square Centimeter = 0.155 Square Inch
UNITS OF VOLUME
1.0 Cubic Foot = 1728 Cubic Inches = 7.48 US Gallons 1.0 British Imperial Gallon = 1.2 US Gallons 1.0 Cubic Meter = 35.314 Cubic Feet = 264.2 US Gallons 1.0 Liter = 1000 Cubic Centimeters = 0.2642 US Gallons
UNITS OF WEIGHT
1.0 Metric Ton = 1000 Kilograms = 2204.6 Pounds 1.0 Kilogram = 1000 Grams = 2.2046 Pounds 1.0 Short Ton = 2000 Pounds
UNITS OF PRESSURE
1.0 Pound per square inch = 144 Pound per square foot 1.0 Pound per square inch = 27.7 Inches of water() 1.0 Pound per square inch = 2.31 Feet of water() 1.0 Pound per square inch = 2.042 Inches of mercury() 1.0 Atmosphere = 14.7 Pounds per square inch (PSI) 1.0 Atmosphere = 33.95 Feet of water() 1.0 Foot of water = 0.433 PSI = 62.355 Pounds per square foot 1.0 Kilogram per square centimeter = 14.223 Pounds per square inch 1.0 Pound per square inch = 0.0703 Kilogram per square centimeter UNITS OF POWER
1.0 Horsepower (English) = 746 Watt 0.746 Kilowatt (KW) 1.0 Horsepower (English) = 550 Foot pounds per second 1.0 Horsepower (English) = 33,000 Foot pounds per minute 1.0 Kilowatt (KW) = 1000 Watt = 1.34 Horsepower (HP) English 1.0 Horsepower (English) = 1.0139 Metric horsepower (cheval-vapeur) 1.0 Metric horsepower = 75 Meter X Kilogram/Second 1.0 Metric horsepower = 0.736 Kilowatt = 736 Watt
* At 62 degrees Fahrenheit (16.6 degrees Celsius).
IX. DICTIONARY OF TERMS
AIRTIGHT--Having no place for air to enter.
ANVIL--A heavy block of iron or steel with a smooth, flat top on which metals are shaped by hammering.
CORRUGATED--Shaped into folds that have alternating ridges.
DIA.--Diameter. A straight line passing through the center of a circle and meeting the circumference of the circle at at each end.
DISTILLATION--A process used to purify saltwater by separating the water from the salt. The saltwater is boiled into steams. The steam condenses in a cool receiver, and cools into pure water.
EQUATOR--A great circle dividing the northern parts of the earth from the southern parts of the earth.
FIBERGLASS--A composite material consisting of glass fibers in resin.
GALVANIZED STEEL--Steel that has been coated with zinc to resist rust.
HORIZON--The line or circle that forms the apparent boundary between earth and sky.
HYGIENE--THE science of preserving health; the prevention of illness by keeping clean.
INFRARED--Electromagnetic radiation having wavelengths greater than visible light and shorter than microwaves.
INTERVALS--The space between points, things, times, etc.
LATITUDE--The angular distance north or south of the equator, measured in degrees along a meridian.
LIFESPAN--The longest period over which the life of any plant, animal, or machine may extend. How long something lives or works.
POLYURETHANE FOAM--A foam made of a thermoplastic or thermosetting resin.
RADIATION--The process by which energy is given off by one body, travels through space, water, or something else, and is absorbed by another body.
RUST--The red or orange coating that forms on the surface of iron when exposed to air and moisture.
SOLDER--A fusible alloy that joins metal objects without heating them to the melting point. The solder is applied in a melted state.
STATIONARY--Permanent, not moveable.
STOVE BOLT--A small bolt, similar to a machine screw but with a coarser thread.
TEMPERATE ZONE--An area of the earth that is warm in the summer, cold in the winter, and moderate in the spring and fall.
THERMOSYPHON--Moving liquid from one place to another by changes in heat.
TILTED--Leaning, sloping, or slanted; raised at one end.
WATERPROOF--Made or treated with a rubber, plastic, or another sealing agent to prevent water from entering.
X. FURTHER INFORMATION RESOURCES
Bolwell, A.J. Polyurethane Foam Insulated Solar Hot Water System. Available from VITA.
Brace Research Institute. How to Build a Solar Water Heater, Leaflet L-4, 1965, revised 1973. Brace Research Institute, MacDonald College of McGill University, Ste. Anne de Bellevue, Quebec, Canada. Very useful, highly detailed plans for building a low-cost, thermosyphon water heater which uses materials available almost everywhere, even in developing countries. This design has been successfully built and used extensively in Barbados. Highly recommended.
Brooks, F.A. Use of Solar Energy for Heating Water. Available from VITA.
Brown, R.J. "Domestic and Commercial Solar Water Heating for Equatorial Areas." Sun at Work, 4th quarter, 1966. I.S.W. Hart & Co., P. Ltd., Fremantle, Australia.
CSIRO. Solar Water Heaters, Circular #2, 1964. CSIRO, PO Box 26, Highett, Victoria, Melbourne, Australia 3190. Good basic overview of the theory, design, construction, and economics of home solar water heating systems. Contains useful information on the different factors to be considered at different latitudes. Quite practical; it gives one a good idea of how a system can be expected to perform.
Czarnecki, J.T. Performance of Exp. Solar Water Heaters in Australia. CSIRO, PO Box 26, Highett, Victoria, Melbourne, Australia 3190. Contains detailed test results of combination solar/electric water heating systems in six Australian cities. Has useful mathematical formulas and graphs, for the amount of absorber area needed to collect a given amount of heat.
Farber, Erich A. Solar Water Heating. University of Florida, Gainesville, Florida USA.
Fun & Frolic, Inc. "Water Heating." Solar Energy Primer. Fun & Frolic, Inc., PO Box 277, Madison Heights, Michigan 48071 USA.
Khanna, M.L. Development of Solar Water Heaters in India. National Physical Laboratory, Pusa, New Delhi, India.
Mathur, K.N., Khanna, M.L., Davey, T.N. and Suri, S.P. Domestic Solar Water Heater. National Physical Laboratory, Pusa, New Delhi, India.
Miromit Sun Heaters, Ltd. Miromit Newsletter, No. 7, July 1963. Miromit Sun Heaters, Ltd., 323 Hayarkon Street, Tel-Aviv, Israel (POB 6004).
Mother Earth News. "Kenneth Whetzel's Solar Heater." Handbook of Homemade Power. Mother Earth News, Box 70, Hendersonville, North Carolina 28739 USA. An extended anecdote about building and using a simple thermosyphon solar water heating system from "scrap parts"--sheet metal, copper tubing, plastic, and small metal tank insulated with styrofoam. Of limited value.
Ridenour, Steven M. "Homemade Solar Water Heaters." Producing Your Own Power. Rodale Press, Emmaus, Pennsylvania USA. A good overview of different types of simple collectors, their construction, and use. Includes designs of thermosyphon, pressurized and heat transfer systems. Written in simple language, it also presents the basic principles of solar water heating systems.
Running Press. Solar Energy--Some Basics, Energy Book #1. Running Press, 38 South 19th Street, Philadelphia, Pennsylvania 19103 USA.
Singh, Prof. Deep Narayan. Standardized Typical Designs of Solar Water Heater Systems for Supplying Hot Water for Heating and Domestic Purposes for Detached Houses in India. Bihar College of Engineering, University of Patna, Patna 800005 India.
University of Florida. Solar Energy Studies, Tech. Progress Report #9, Vol. XIV, No. 2. University of Florida, Gainesville, Florida USA. Although rather dated, this booklet contains a good overview of different solar water heaters and some information on the principles of solar heating, as well as a section on "presently used" (1960) solar water heating installations. Also has a section on solar-powered refrigeration.
APPENDIX I
DECISION MAKING WORKSHEET
If you are using this as a guideline for using the Solar Water Heater in a development effort, collect as much information as possible and if you need assistance with the project, write VITA. A report on your experiences and the uses of this manual will help VITA both improve the book and aid other similar efforts.
Volunteers in Technical Assistance 1815 North Lynn Street, Suite 200 Arlington, Virginia 22209 USA
CURRENT USE AND AVAILABILITY
* Note current domestic and agricultural practices which might have potential for solar application.
* Document days of sunshine, seasonal changes, haze, cloud cover. Another way of finding the information is to search out annual rainfall figures and work from there.
* Have solar technologies been introduced previously? If so, with what results?
* Have solar technologies been introduced in nearby areas? If so, with what results?
* Are there other current practices which might be enhanced by improved use of solar energy--for example, salt production?
IDENTIFY APPROPRIATENESS OF THIS TECHNOLOGY
* Is there a choice to be made between a solar technology and another alternative energy technology? Or, is it important to do both on a demonstration basis?
* Under what conditions would it be useful to introduce a solar technology for demonstration purposes?
* If solar units are feasible for local manufacture, would they be used? Assuming no "funding," could local people afford them? Are there ways to make the solar technologies "pay for themselves?"
* Could this technology provide a basis for a small business enterprise?
NEEDS AND RESOURCES
* What are the characteristics of the problem? How is the problem identified? Who sees it as a problem?
* Has any local person, particularly someone in a position of authority, expressed the need or showed interest in solar technology? If so, can someone be found to help the technology introduction process? Are there local officials who could be involved and tapped as resources?
* How will you get the community involved with the decision of which technology is appropriate for them.
* Based on descriptions of current practices and upon this manual's information, identify needs which solar technologies appear able to meet.
* Are materials and tools available locally for construction of technologies?
* Are there other projects already underway to which a solar component might be added so that the ongoing project acts as a technical and even financial resource for the new effort? For example, if there is a post harvest grain loss project underway, could improved solar drying techniques be introduced in conjunction with the other effort?
* What kinds of skills are available locally to assist with construction and maintenance? How much skill is necessary for construction and maintenance? Do you need to train people? Can you meet the following needs?
* Some aspects of this project require someone with experience in metal-working and/or welding. Estimated labor time for full-time workers is:
* 8 hours skilled labor * 8 hours unskilled labor
* Do a cost estimate of the labor, parts, and materials needed.
* How will the project be funded? Would the technology require outside funding? Are local funding sources available to sponsor the effort?
* How much time do you have for the project? Are you aware of holidays and planting or harvesting seasons which may affect timing?
* How will you arrange to spread knowledge and use of the technology?
FINAL DECISION
* How was the final decision reached, either to go ahead or not to go ahead, with this technology?
APPENDIX II
RECORD KEEPING WORKSHEET
CONSTRUCTION
Photographs of the construction process, as well as the finished result, are helpful. They add interest and detail that might be overlooked in the narrative.
A report on the construction process should include very specific information. This kind of detail can often be monitored most easily in charts (such as the one below). (see report 1)
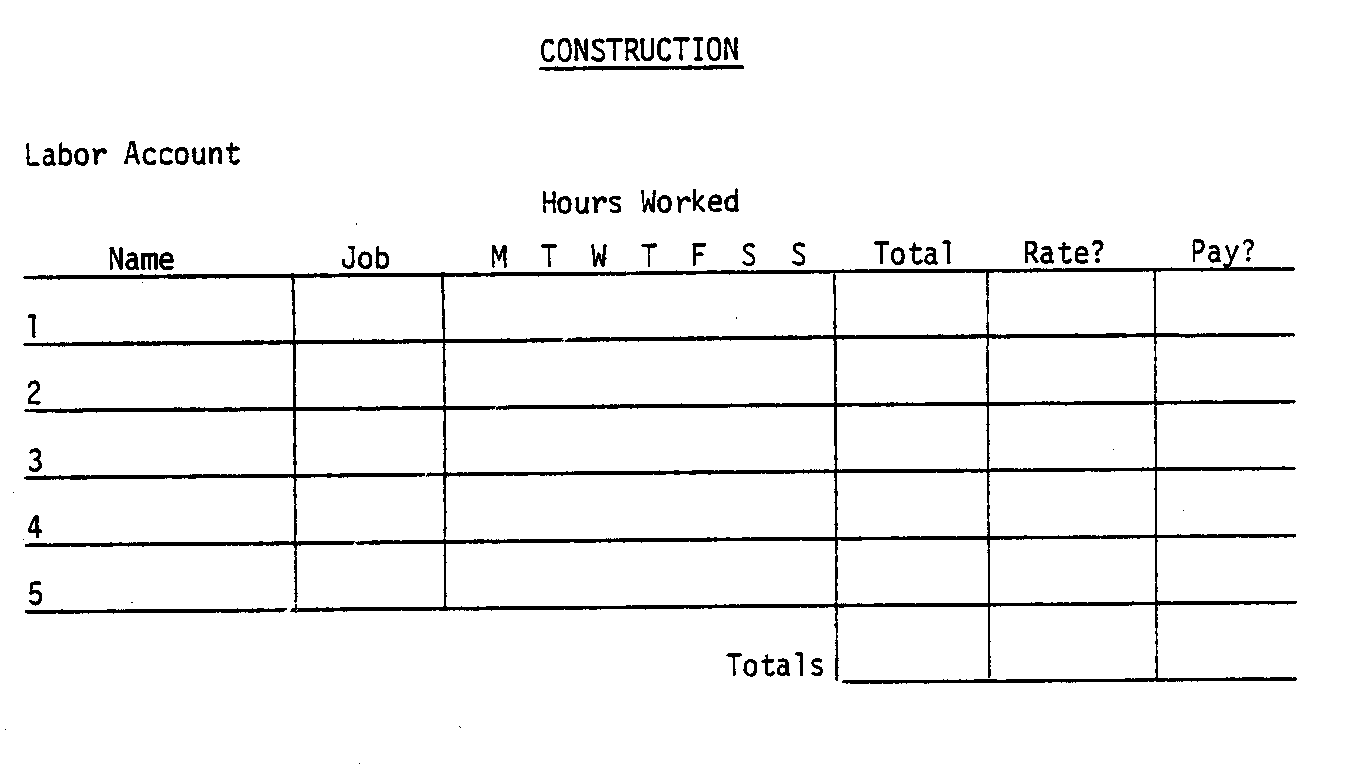
Some other things to record include:
* Specification of materials used in construction.
* Adaptations or changes made in design to fit local conditions.
* Equipment costs.
* Time spent in construction--include volunteer time as well as paid labor, full- and/or part-time.
* Problems--labor shortage, work stoppage, training difficulties, materials shortage, terrain, transport.
OPERATION
Keep log of operations for at least the first six weeks, then periodically for several days every few months. This log will vary with the technology, but should include full requirements, outputs, duration of operation, training of operators, etc. Include special problems that may come up--a damper that won't close, gear that won't catch, procedures that don't seem to make sense to workers, etc.
MAINTENANCE
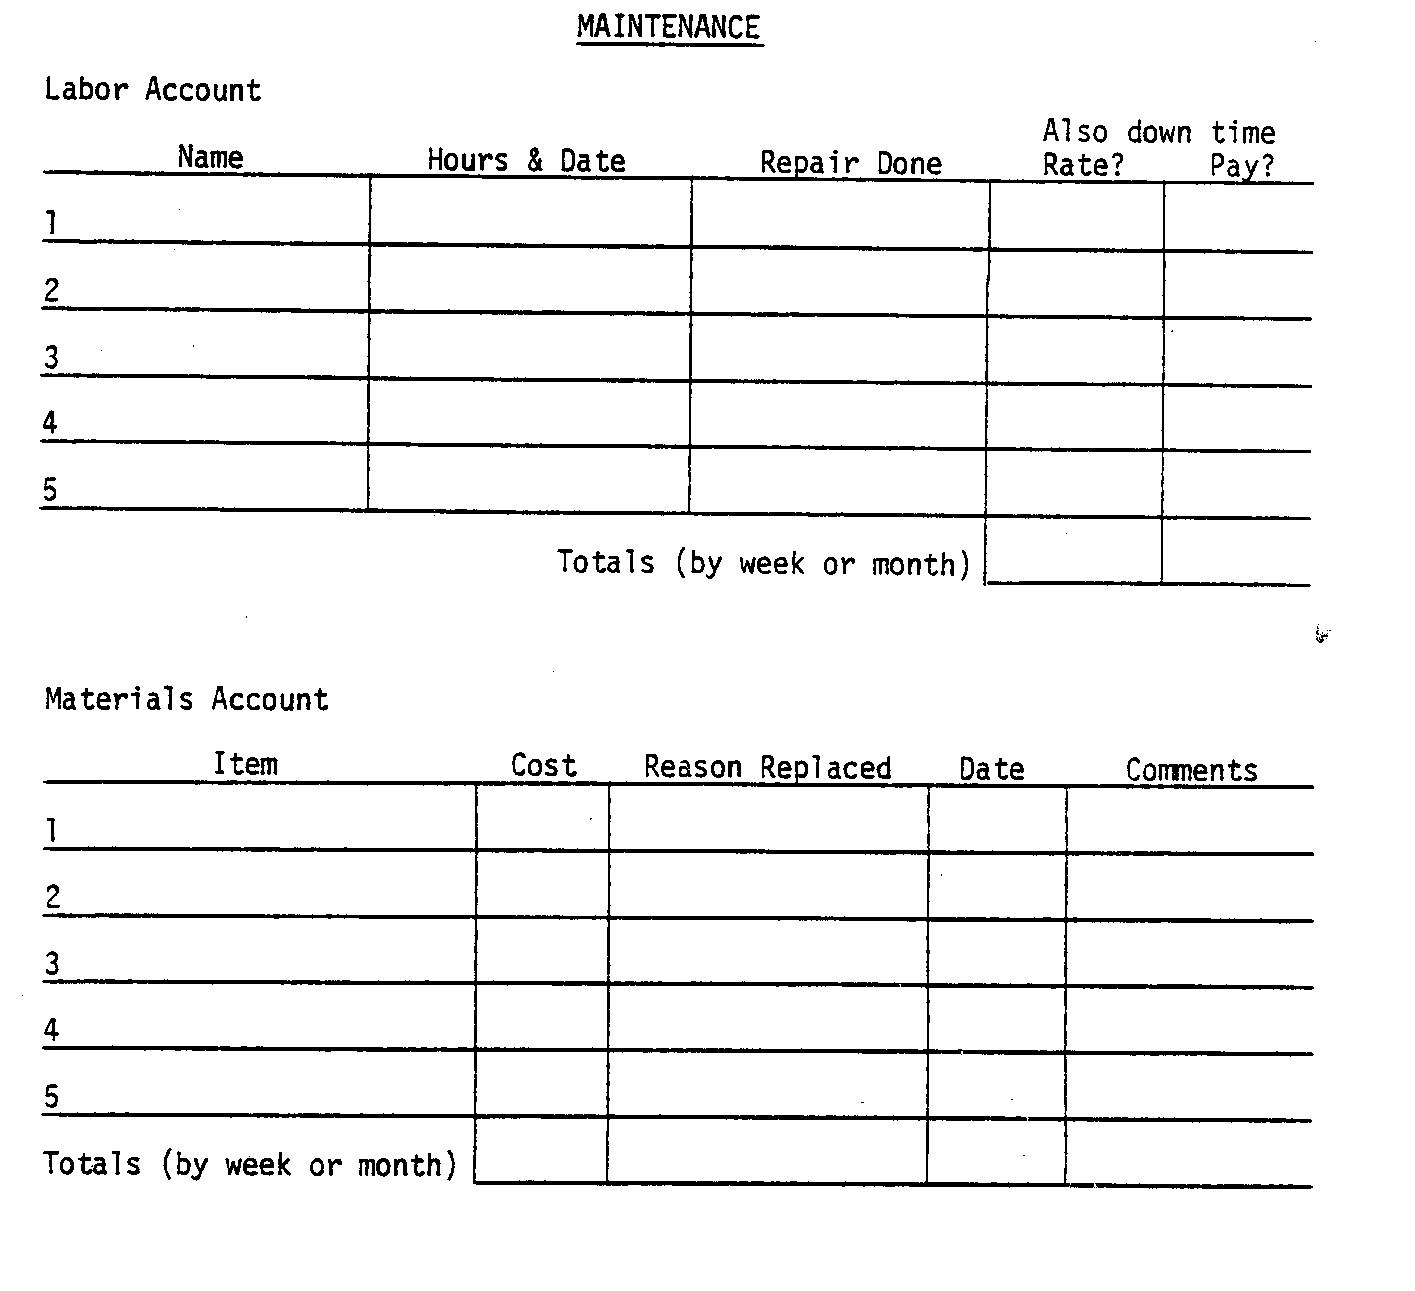
Maintenance records enable keeping track of where breakdowns occur most frequently and may suggest areas for improvement or strengthening weakness in the design. Furthermore, these records will give a good idea of how well the project is working out by accurately recording how much of the time it is working and how often it breaks down. Routine maintenance records should be kept for a minimum of six months to one year after the project goes into operation. (see report 2)
SPECIAL COSTS
This category includes damage caused by weather, natural disasters, vandalism, etc. Pattern the records after the routine maintenance records. Describe for each separate incident:
* Cause and extent of damage. * Labor costs of repair (like maintenance account). * Material costs of repair (like maintenance account) . * Measures taken to prevent recurrence.
MANUALS IN THE ENERGY SERIES
This book is one of a series of manuals on renewable energy technologies. It is primarily intended for use by people in international development projects. However, the construction techniques and ideas presented here are useful to anyone seeking to become more energy self-sufficient. The titles in the series are:
Helical Sail Windmill
Hydraulic Ram
Making Charcoal: The Retort Method
Overshot Water-Wheel: Design and Construction Manual
Small Michell (Banki) Turbine: A Construction Manual
Solar Still
Solar Water Heater
Three Cubic Meter Bio-Gas Plant: A Construction Manual
For a free catalogue of these and other VITA publications, write to: VITA Publications Service P. 0. Box 12028 Arlington, Virginia 22209 USA
ABOUT VITA
Volunteers in Technical Assistance (VITA) is a private, nonprofit, international development organization. VITA makes available to individuals and groups in developing countries a variety of information and technical resources aimed at fostering self sufficiency--needs assessment and program development support; by-mail and on-site consulting services; information systems training; and management of long-term field projects. VITA promotes the application of simple, inexpensive technologies to solve problems and create opportunities in developing countries.
VITA places special emphasis on the areas of agriculture and food processing, renewable energy applications, water supply and sanitation, housing and construction, and small business development. VITA's activities are facilitated by the active involvement of VITA Volunteer technical experts from around the world and by its documentation center containing specialized technical material of interest to people in developing countries.