The Benefits of Using a Conservation Agriculture Planter
Reduced soil disturbance
Because a minimum-tillage planter can plant seed without plowing, it allows mulch and crop residues to be left on the soil surface, providing many benefits (see below). Planting without plowing also enables farmers to plant at the optimum time since they don’t have to wait for their fields to be plowed first.
Soil Cover
By keeping soils covered, evaporation is reduced, and precious moisture is conserved. Soil cover also dramatically increases water infiltration, so more rainfall is retained for plants to use, and soil erosion is reduced.
The Benefits of Mechanical Planting
Reduced labor
One or two people can plant a large number of fields, freeing up labor to accomplish other tasks or generating income as a service provider.
Improved timeliness of planting
Because fields can be planted quickly, farmers can take advantage of rainfall and plant at the optimum time.
Less competition between plants
When planting with a hand hoe, most farmers plant several seeds in each planting station. A mechanical planter drops seed evenly spaced within the row. In this way, competition between plants is reduced.
Optimum and consistent plant spacing
A well-calibrated planter can be adjusted to account for planting conditions (e.g. by planting at a higher rate when planting into dry soil or when using seed which has lower germination rate) and that spacing can be maintained consistently throughout the field.
Optimum and consistent planting depth
A well-calibrated planter can be adjusted to plant at the proper depth for different seed species and different soil moisture conditions (e.g. deeper when moisture is lower in the soil profile, shallower when conditions are very wet). Because seeds are planted at the same depth, they will germinate and emerge at the same time, making other field operations, like weeding, more efficient.
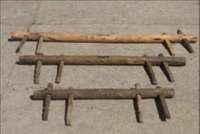
The Parts of a Maresha Planter
Overall View
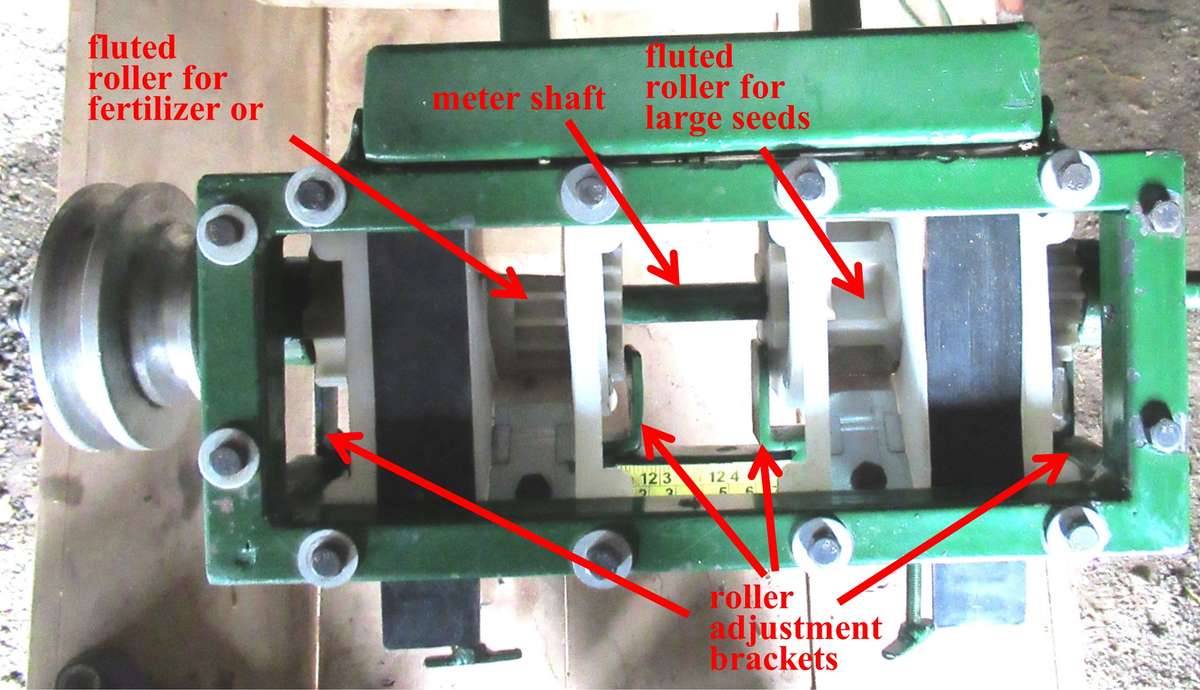
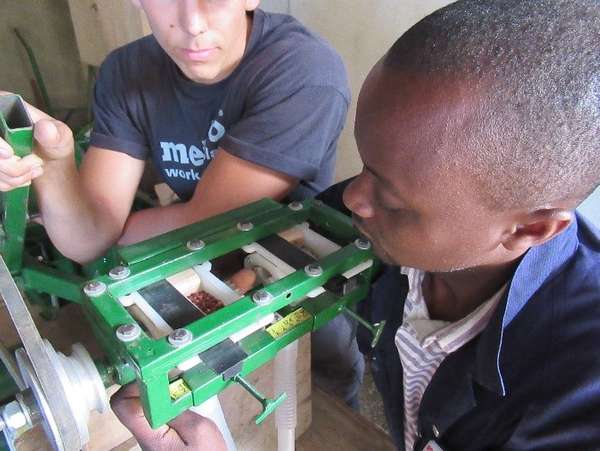
Seeding Mechanism: Top View
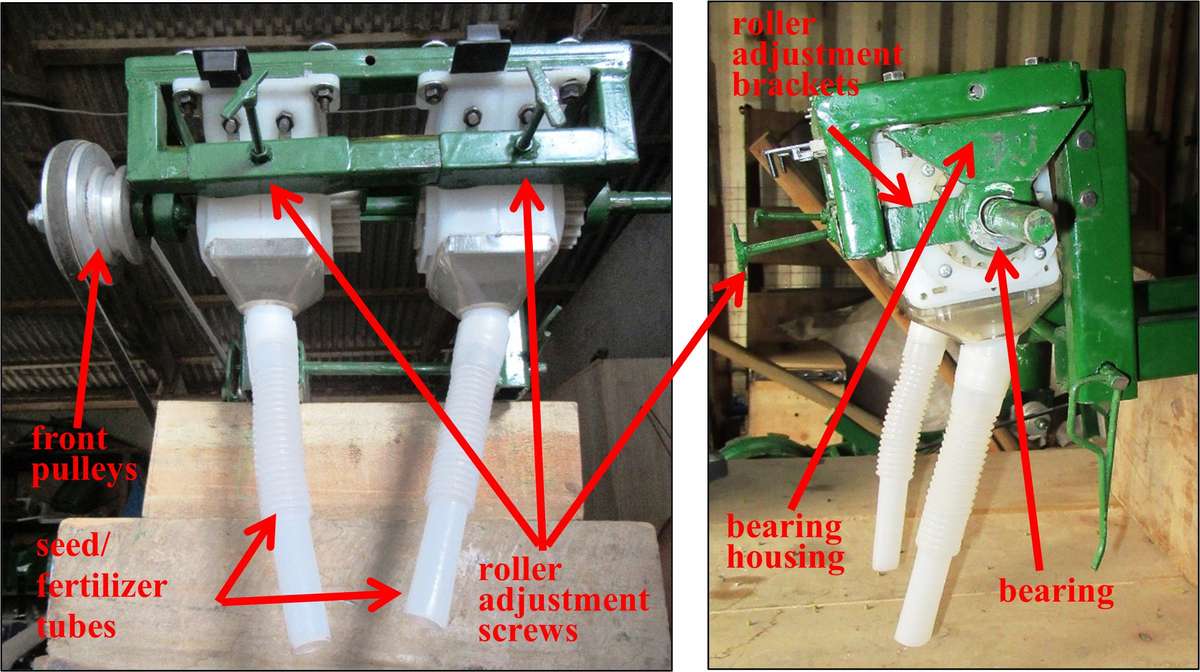
Seeding Mechanism: Front View and Side View
Basic Operation of the Planter
Contour planting
In order to reduce water movement and soil erosion, sloping land should always be planted along the contour, not up and down the slope.
Planting patterns
Because of the long beam of the maresha planter, it may be difficult for oxen to make tight turns. One solution to this problem is to plant while circling the entire field perimeter, planting both the sides and the ends of the field. In this way, the oxen will only need to turn 90 degrees at each corner instead of 180 degrees at the ends of the field. When you plant in this fashion, you may leave some gaps in the corners of the field. Planting 2-3 diagonal passes after planting the rest of the field will fill in these gaps.
Select the proper seed meter
The maresha planter is fitted with two independent seed meters. Each of these meters has one compartment with large holes (flutes) and one compartment with small holes (flutes). Depending on which compartments you use, you can apply seed and fertilizer at the same time, or you can plant two different types of seed in alternating rows.
Large flutes are used for large-seeded crops (maize, beans, groundnuts, etc.)
Small flutes are used for fertilizer or small-seeded crops (sorghum, millet, small-seeded cowpea, etc.)
When intercropping two crops you should use 3 baffles to close all but the one compartment with seed of one of the two crops you want to plant. Plant one row around the field. When you reach your starting position again, close the baffle of the compartment for the first crop, and open the compartment for the second crop. Continue planting the field by alternating rows in this fashion. The two crops can use either large or small flutes depending on seed size.
When planting with fertilizer, use the large or small flutes on one of the meters according to your seed size. Then use the small flutes on the other meter to apply fertilizer. Both compartments should be open while planting so that the seed and fertilizer are dropped into the same furrow.
Adjustments and Fine Tuning
1Be sure to train the oxen well before planting time, with the yokes that they will be using, so that you don’t waste time training them when you should be planting.
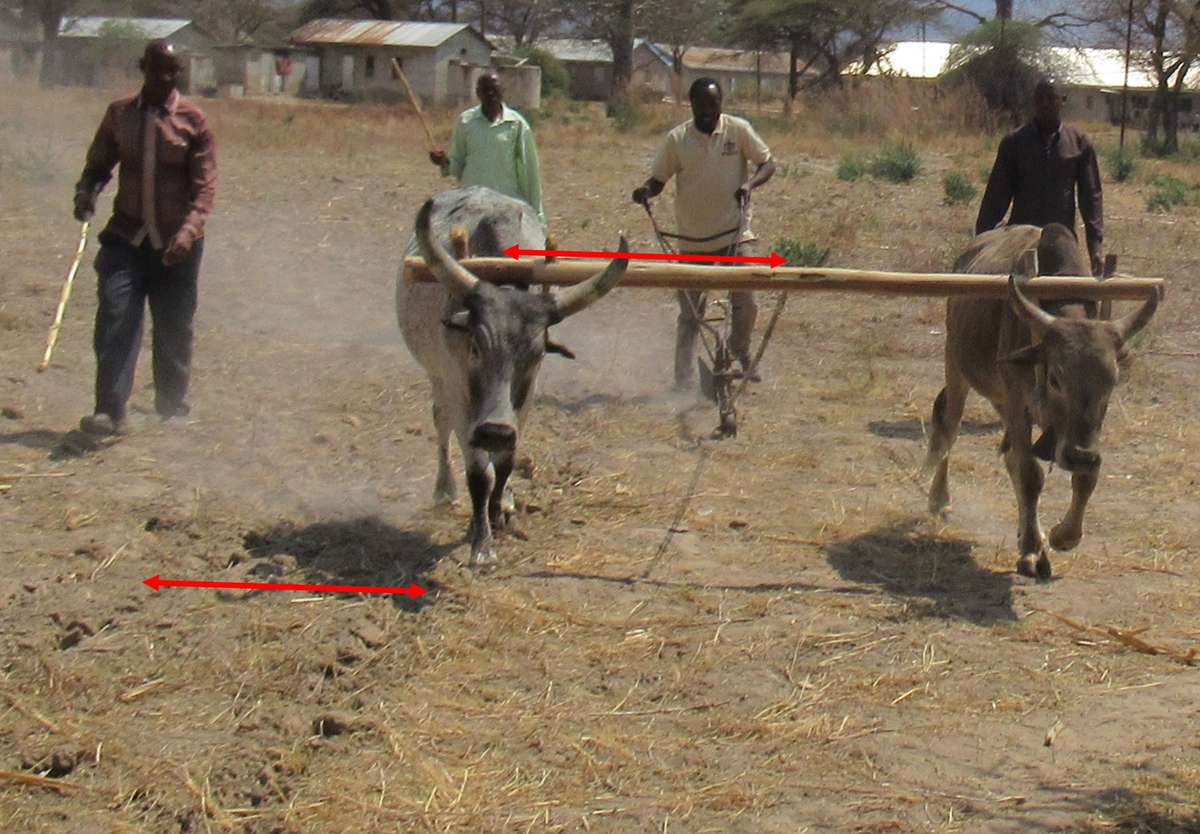
Furrow spacing & length of yoke: Since most oxen prefer to walk in the previous furrow, the distance between every 2 rows will be the same as the distance between where one ox is walking and the center of the yoke (see figure). Select your yoke length according to the row spacing for the crop you will plant (see Appendix A for recommendations on row spacing for different crops). If your oxen are used to one length of yoke, they may need some practice using yokes of different lengths.1
The distance from one ox to the center of the yoke is the same as the distance between the rows.
Calibration of Seed and Fertilizer
These yokes will plant rows which are 75 cm, 60 cm and 45 cm apart.
Select your desired seed spacing:
Guidelines for optimum seed spacing of crops can be found in Appendix A at the end of this publication. These guidelines are minimum seeding rates, and should be increased when planting under adverse conditions (e.g. old seed, dry weather, rough soils, excess residue, etc.)
Compare these guidelines with the plant spacing that you, or the farmer you are planting, for are used to using. If they are used to planting several seeds in each planting station, have them demonstrate by dropping seeds on a hard surface at the same spacing they are used to using. After they have done so, space their seeds out evenly and measure the average distance between every 2 seeds.
Decide on a final seed spacing (how many cm between seeds)
Consult the appropriate calibration chart on your seed hopper to determine:
Which pulleys to use in the front and rear
How many seeds should drop per 10 revolutions of the drive wheel
Planter calibration for lare-seeded crops using large flutes
Desired spacing between seeds
10
15
20
25
30
35
Rear sprocket (diameter in cm)
9
9
9
6
6
6
Front sprocket (diameter in cm)
6
6
9
9
9
9
Seed count per 10 wheel rotation
141
94
71
57
47
40
The below charts guide both seed and fertilizer calibration:
Planter calibration for large-seeded crops using large flutes
Crop
Maize
Lablab
Pigeon pea
Sunflower
Beans
Row Spacing (cm)
75
90
75-90
75-90
75
90
35-45
Rear Pulley (cm)
6
6
6
6
6
9
9
Front pulley (cm)
9
9
9
9
9
6
6
Distance between seeds (cm)
25-30
20-25
20-25
20-25
20-25
15-20
10-15
Seeds per 10 wheel rotations
50-70
60-80
60-80
60-80
60-80
70-90
100-140
Planter calibration for small-seeded crops using small flutes
Crop
Sorghum
Millet
Cowpea (bushy)
Mung bean
Beans
Row Spacing (cm)
60
90
60
90
45
45
45
Rear Pulley (cm)
6
6
6
6
6
6
6
Front pulley (cm)
15
11
9
11
19
15
15
Distance between seeds (cm)
10-15
7-10
5-8
7-12
20-30
10-15
10-15
Seeds per 10 wheel rotations
100-140
140-200
120-200
180-280
50-70
100-140
100-140
Planter calibration for fertilizer
Desired Fertilizer rate (kg/ha)
30
60
30
60
30
60
Row width (cm)
60
60
75
75
90
90
Rear Pulley (cm)
6
6
6
6
6
6
Front pulley (cm)
9
9
9
9
9
9
Fertilizer per 10 wheel rotations (ml)
28
57
35
71
42
85
Steps to calibrate the planter seeding rate:
Place the planter on blocks so that the drive wheel can turn freely
Remove the seed tube from the point and place it in a container to catch the seeds
Remove the seed hoppers so that you can view flutes while adjusting
Fill the meter ½ full with seed
Add belt tension and the turn drive wheel 10 times
Tap the seed funnel to remove any remaining seeds
Count the seeds
Note measuring tape position while adjusting flutes
Release the belt tension so that the fluted roller can be adjusted freely
Slide the meter back and forth to open or close the flutes to adjust the seeding rate. Note the position of the bracket on the measuring tape to be sure you don’t over or under-adjust the roller opening
Repeat steps 4 through 8 until you get the desired number of seeds (or slightly more) at least 2 times in a row
If you experience inconsistent seed counts refer to the "General Trouble Shooting & Potential Problems" section of this manual.
Steps to calibrate your planter’s fertilizer rate:
Use the same steps as with seed calibration except measure the weight or volume of fertilizer for every 10 turns of the drive wheel.
For a microdosing rate of fertilizer (30-60 kg/ha) calibrate the planter to apply:
25-50 g fertilizer (30-60 ml) if planting in 60 cm rows
32-65 g fertilizer (35-70 ml) if planting in 75 cm rows
40-80 g fertilizer (45-90 ml) if planting in 90 cm rows
Seeding depth adjustments
Seeding depth should be adjusted any time you change crop type, oxen, soil type or soil moisture.
It may be difficult to see how deep you are seeding, especially for small-seeded crops. However, in most soils, the seed will drop to the bottom of the furrow cut by the maresha point. If you are having difficulty finding the seeds you have planted, you should assume they are being planted to the bottom of the furrow.
Plant deeper if you expect dry weather and shallower if you expect wet weather.
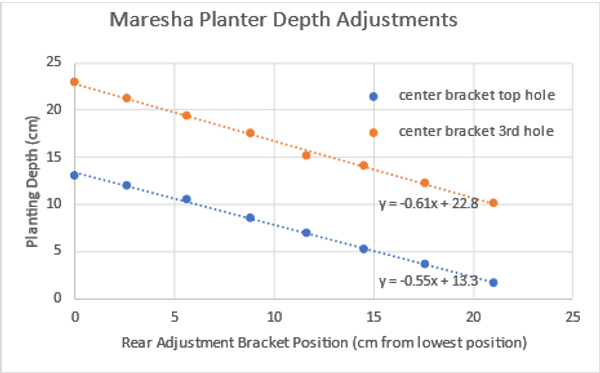
Adjusting the center height adjustment pin
This pin has 3-5 positions. Putting the pin in the upper hole results in the shallowest planting depth. Moving the pin one hole lower results in a 4 cm deeper planting depth, while moving it higher results in a 4 cm shallower depth. Because moving this pin is difficult in the field, especially if you are already hooked to an ox team, it’s best to set it where you expect to need it before going to the field. If your oxen are relatively small (e.g. 90 cm or less when measuring from the bottom of the yoke to the ground) you will mostly likely want to use the top hole. If your oxen are taller (100-110 cm from the bottom of the yoke to the ground) you should use the middle or lower holes.
Set the front adjustment pin before going to the field based on the height of your oxen. Use the rear adjustment bracket for fine-tuning in the field.
Adjusting the rear height adjustment bracket
This adjustment is easier to make since it only involves removing a wing nut. Use the rear bracket for fine-tuning your planting depth after hooking the planter to an ox team and beginning to plant. Moving the pin one hole lower will cause the planter to plant deeper by approximately 1.5 cm. Moving it higher will plant shallower by 1.5 cm.
Adjusting yoke attachment point
The height of the beam where it attaches to the ox yoke will affect the depth of planting. However, loosening the attachment of the beam so that it hangs below the yoke is not effective because when the oxen begin pulling, the beam will be lifted upward, resulting in an inconsistent planting depth. Changing the planter beam attachment from the bottom of the yoke to the top of the yoke, the planter will plant shallower by 1/3 of the thickness of the yoke (approximately 3-4 cm).
Adjusting the angle and/or length of the handle and point
As noted in Appendix B, these dimensions are somewhat flexible, however, adjustments should be done only if adjusting the middle and rear height adjustment brackets doesn’t result in the desired planting depth. Changing the length of the handle to the point may cause the seed tube to no longer align well with the point, so be sure that the tube isn’t bent in a way that seed would be prevented from falling freely. You may also need to extend the seed tube if adjusting the handle/point leaves it unable to reach the point entry tube.
Field Preparation
Plan ahead
Poor field conditions will result in a poor planting job. Before taking the planter to a field, be sure to verify that the land is relatively smooth, weeds have been managed appropriately, and mulch or crop residues have been managed so that they will not accumulate on the planter point.
Level rough fields
If a field was left rough after plowing, or has many high and low spots for another reason, the planter will not be able to maintain a consistent planting depth. Such a field should be leveled first to allow the planter to function properly.
If the field is grown up in weeds, or covered with heavy crop residues, several strategies can be used:
If weeds are young and tender:
A shallow hoeing may be effective just before or after planting.
Spray a herbicide just before or after planting. This strategy is only effective if weeds are green and growing. Tough, dried weeds will not be killed by a herbicide. See the "Weed Control" section below in this manual for more on using herbicides.
If weeds are older and/or woody:
Try planting directly without slashing or weeding. Standing weeds are often easier to plant into than weeds which have been slashed. Slash tall, woody weeds after planting.
Cut weeds or crop residue into smaller pieces (30-40 cm length). This will prevent them from catching and building up on the planter point. Leaving 30-50 cm of standing residue, rather than slashing down to ground level, will also reduce residue build-up.
Graze the field with livestock to reduce the residue somewhat. Be sure you remove the animals and leave at least 30% soil cover or you will lose the soil-cover benefits of moisture retention and reduction in soil erosion!!
Remove some of the residue by hand before planting. Excess residue can be pulled to one side, or into alleys, then returned as mulch after planting. This requires a lot of labor, and so it should be used as a last resort.
Weed Control
Using herbicides
Timing: The decision of when to spray should depend on the number and kinds of weeds present in the field.
Glyphosate (Roundup) works best on young, actively growing weeds. Old, mature weeds should be slashed and allowed to regrow new foliage before spraying.
Add sulfate of ammonia fertilizer (200 g per backpack sprayer) to condition the water before adding glyphosate. This can increase its effectiveness dramatically.
Spraying just after planting (but before the crop emerges!) provides maximum kill of annual weeds which germinate around planting time.
Spraying 1 week before planting helps to kill tough perennial weeds which may make planting difficult.
Always use protective equipment and take precautions to prevent exposure to pesticides!
If you plan to hoe rather than to use herbicides
Leave weed and crop residues on the soil surface to protect the soil from evaporation and soil erosion.
Slash taller weeds into short pieces before hoeing since residue longer than 30-40 cm will catch and build up on the planter point.
Allowing weeds to remain, then hoeing right after planting will help minimize residue build-up on the planter point, and will allow residue to be placed near to the seed for maximum moisture retention.
General Trouble Shooting & Potential Problems
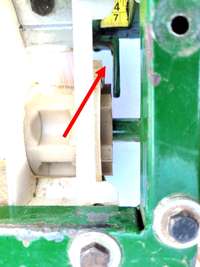
Even a small gap can cause inconsistent seed counts
If the seed count keeps changing during calibration
Check the seed meter adjustment bracket to be sure it is firmly against the sides of the roller, but not binding against the flute corners (see picture). If the bracket is loose, it will allow the flutes to move back and forth, resulting in inconsistent seed counts, especially when planting small-seeded crops.
Adjust the flute opening so that at least 1-2 seeds can enter each flute. If the opening is closed too far, some flutes will not catch a seed, and this will result in gaps and inconsistent seed drop. If opening the flutes wider results in a higher than desired seed count, place a larger diameter pulley in the front (seed meter shaft) to reduce the seed count.
Seed catching on trailing residue
Keep a close watch for any residue which builds up and drags behind the point. Seed may fall on top of this residue, preventing it from dropping to the proper depth at the bottom of the furrow.
Poor seed coverage
In wet, cloddy soils, the drag chain may not be able to adequately back-fill the furrow and cover the seed. Wait for the soil to dry out somewhat before planting.
Excess weed cover or crop residue, can also prevent the drag chain from adequately back-filling the furrow and cover the seed. Reduce the residue cover somewhat using the above-recommended methods.
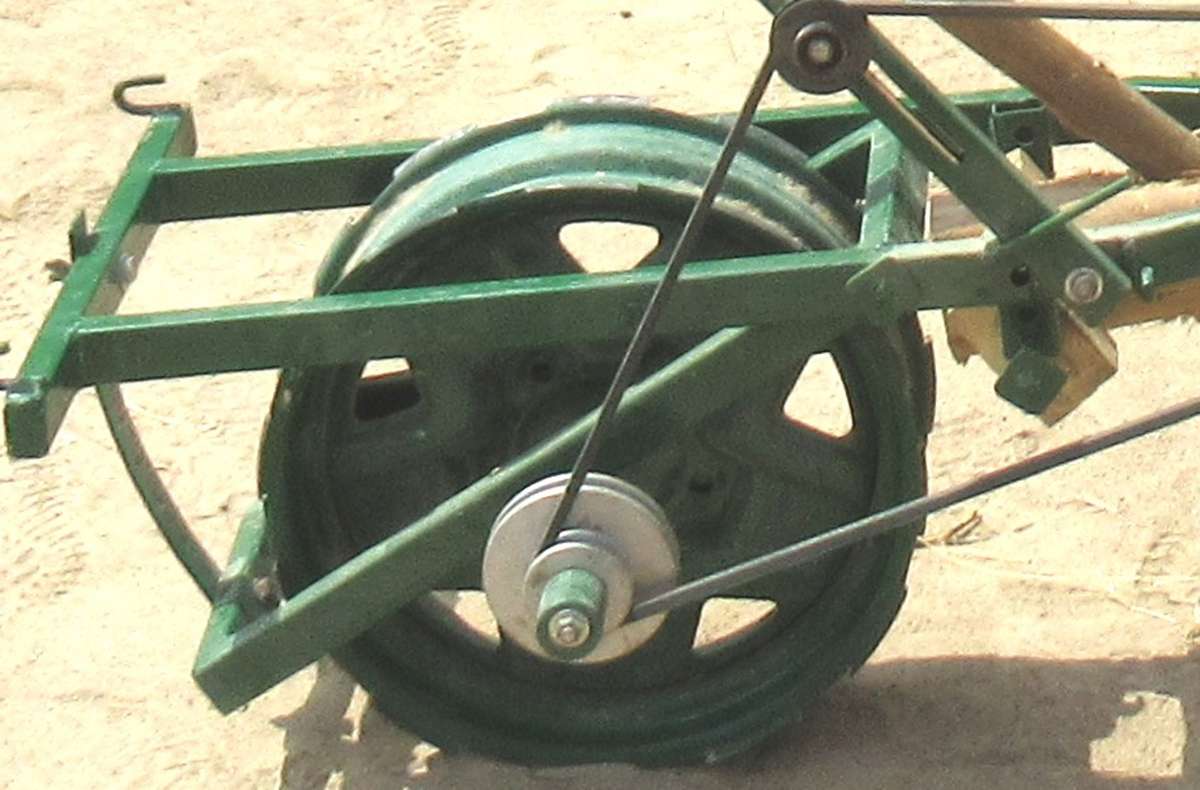
Dirt build-up on pulleys
Keep a close watch on the pulleys, especially during moist weather. If dirt builds up, it may cause the pulleys to stop turning and must be removed immediately.
Poor drive wheel traction (drive wheel slips along the soil surface). Possible causes and solutions include:
Belt tension is too high. Reduce the belt tension somewhat.
Slippery or loose, powdery soils. Applying down-pressure on the planter handle, or weight on the planter, may help. If this problem persists, welding aggressive cross-pieces on the drive wheel may be necessary to increase traction.
Hard soils and poor point penetration. If you are struggling to achieve adequate planting depth, the point may not be penetrating the soil, and the drive wheel will be lifted out of contact with the soil surface. Applying down-pressure on the planter handle, or weight on the planter, may help. Changing the angle of the point may help it penetrate more effectively. Make sure that the digging point is not worn flat and consider cutting it to a sharper angle. If none of these solutions work, you may need to wait for rain to soften the soil.
Maintenance of the Planter
Always store the planter in a dry place out of the rain.
Daily Maintenance
Remove any remaining seed after use. It may attract rodents or germinate inside the meter!
Oil the drive wheel after every day of use. 90W transmission oil or used motor oil are good choices for lubrication. The seed meters and shaft do not need lubrication since they have sealed bearings.
Check the roller brushes and meter calibration bracket to be sure they haven’t become damaged or loose. Adjust as needed.
Repairs
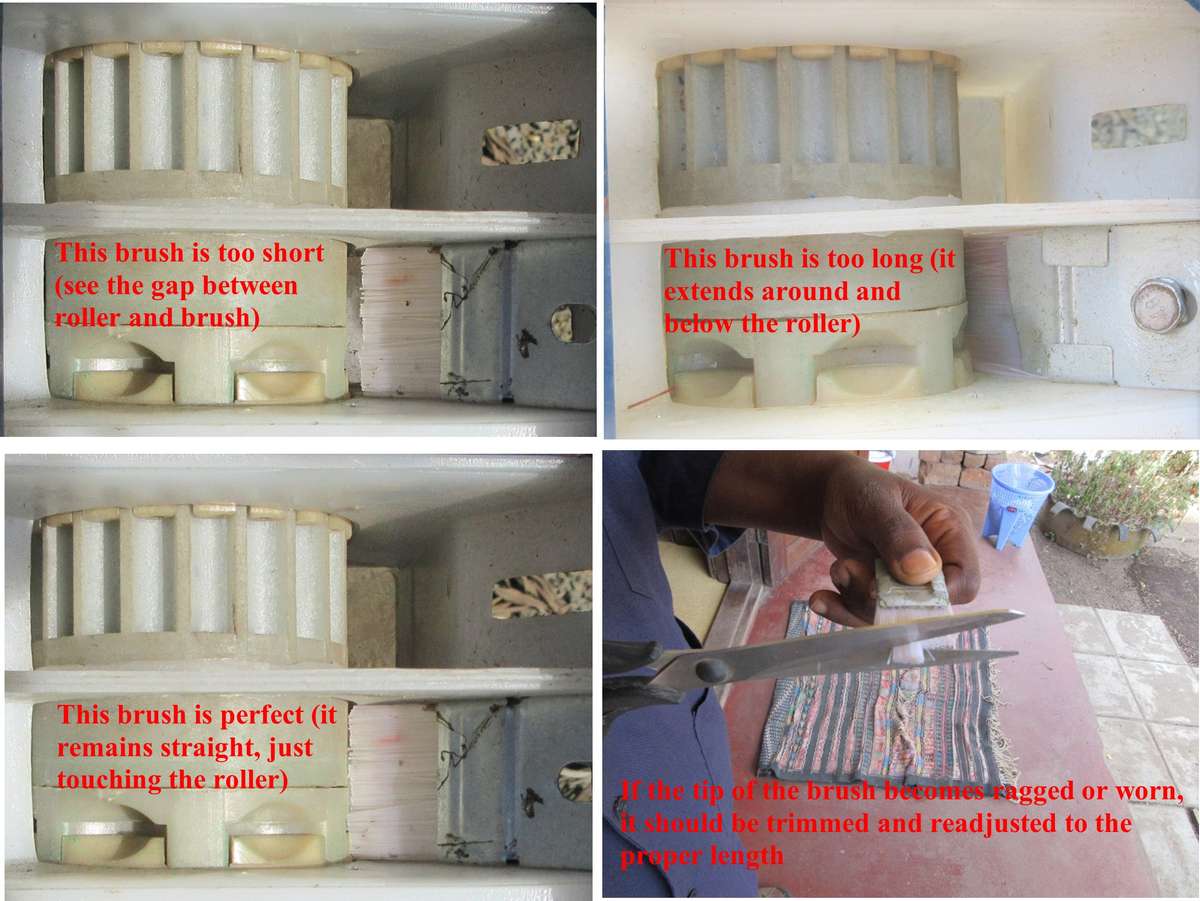
Seed meter brush adjustment and repair
Brushes should be checked daily and adjusted if they are out of alignment or damaged. Poor brush adjustment will result in irregular seeding, especially for small-seeded crops. Proper brush adjustment is illustrated in the following pictures.
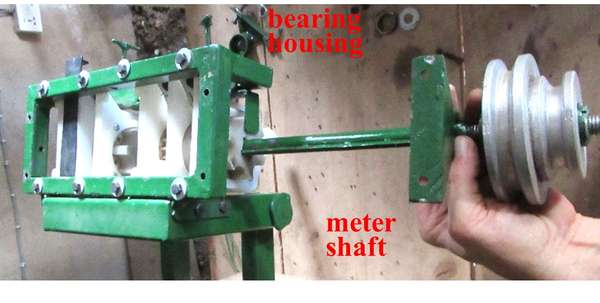
Meter shaft removal
To remove the meter shaft, loosen and remove the bearing housing on the pulley-side of the meter (the pulleys do not need to be removed from the shaft). The shaft should now pull easily out from the meters.
Bearing replacement
Once the meter shaft is removed, the bearings can simply be pressed out of the bearing housing for servicing or replacement (see picture). These bearings are sealed and do not need to be oiled or greased during use.
Meter removal
Remove shaft and mounting bolts, then swivel the meter forward
Once the meter shaft is removed, the meters can be removed by removing the 4 mounting bolts, sliding the meter toward the center of the frame, and swiveling it toward the front of the planter.
Meter disassembly
The fluted rollers can be removed and changed, repaired, or replaced if necessary. In order to remove the fluted rollers, first unscrew one of the retaining rings. Now the roller should slide out of its housing.
Spare Parts
Refer to "The Parts of the Marsha Planter" of this manual to be sure you know which spare part you need.
The following spare parts are commonly available from automotive supply stores:
Seed meter bearing – (10 mm wide, 17mm ID, 34mm OD)
Drive belt – V-belt A-76
The following parts are available through Imaratech in Tanzania [http://edn.link/fgdgpt]. Contact them via the information on their websites for current prices and availability. For further adivce including complete CAD drawings, contact NRMiller58@gmail.com.
Planter point (Can also be made by many local fabricators)
Seed meter brush (Can also be made by many local fabricators)
Meter shaft
Seed meter complete with brush and seed tube
Dual pulley – 9 cm/6 cm diameters (Can also be made by many local machine shops)
Single pulleys of other diameters (Can also be made by many local machine shops)
Business Planning
Planter profit/loss calculation
How to calculate your Return on Investment (ROI)
Add up your expected income: How many days per season do you think you’ll be able to plant various crops for other farmers? How many acres or hectares can you plant in a day? How much will you charge per acre or hectare? (Example: A farmer thinks they will be able to plant maize for 12 days and beans for 15 days in the coming season. In one day, they can plant 3 acres of maize or 2 acres of beans. They plan to charge $9 per acre for planting maize and 15 per acre for planting beans).
Add up your expected expenses: Be sure to include the cost of your time and the hiring value of your oxen since, if you weren’t planting crops, you could be using them to do other work. (Example: Day labor price for the above farmer is $4 per day. To hire an ox team, the local rate is $6 per day. In the coming season he expects to spend around $30 on maintenance and repairs like oil, a new point for the maresha, etc.)
Return on Investment: Subtract your expenses from your income. Compare this value to your investment cost for the planter. How quickly will you be able to repay your investment?
Example of a Return on Investment Calculation
Days
Rate
Cost charged
Totals
Income
Maize planting
12
3 acres/day
$9 per acre
$324
Bean planting
15
2 acres/day
$14 per acre
$420
Total Income
$744
Expenses
Oxen cost
27
$6 per day
$216
Labor cost
27
$5 per day
$135
Maintenance
$30
Total Expenses
$381
Gross Profit
$363
Cost of Investment
$260
Net Profit (ROI)
$103
Conclusion: This farmer expects to repay his investment and make a profit of $103 in the first season
Strategies for maximizing your Return on Investment (ROI)
Plan your work ahead of time
Plan to plant fields which are near each other on the same day in order to reduce travel time and maximize productivity.
Visit customers a day before planting to be sure they have prepared their fields properly, have clean seed, etc.
Consider hiring a partner or employee and work as a team. One person can visit customers ahead of time while the other is planting.
How to attract more customers
Hold a field day where you can demonstrate to your neighbors how your planting service can save them labor and increase their yields.
Partner with other service providers such as agro-vet shops, grain buyers, etc. Offer to promote their services to your customers if they offer to do the same for you. Reward them with a “finder’s fee” such as a reduced price for planting services, if they refer customers to you.
Make your services known to the local agriculture extension office so that they can let other farmers know about the service you offer.
Add other services – As your customers begin to trust you, this will open up opportunities for other business ventures such as:
Seed sales
Spraying services (weed and pest control)
Threshing
Transportation
Appendix A: Plant Population Recommendations
Minimum Plant Spacing1 for Mechanical Planting
Crop
Conditions
Between rows (cm)
Between seeds (cm)
Plants per hectare
Seeds per 10 wheel revolutions2
Maize
Intercropped
90
20-30
37,000-55,000
60-80
Sole cropped
75
25-35
38,000-53,000
50-70
Sorghum
60
10-15
120,000-180,000
95-140
90
7-10
120,000-180,000
140-200
Millet
60
7-12
140,000-220,000
120-200
90
5-8
140,000-220,000
180-280
Beans
Bush varieties
45
10-15
148,000-220,000
95-140
Groundnut
Bush varieties
30-45
7-10
220,000-330,000
140-200
Spreading varieties
60
10-15
110,000-167,000
95-140
Cowpea
Bush varieties
45
20-30
74,000-111,000
50-70
Vining varieties
75
20-30
44,000-67,000
50-70
Pigeon pea
Dwarf varieties
75
15-20
67,000-89,000
70-95
Tall varieties
75
25-35
38,000-53,000
40-60
Lablab
75
25-35
38,000-53,000
40-60
Green gram
45
10-15
148,000-220,000
95-140
Mucuna
75
30
44,000
50
Canavalia
45
20
111,000
70
Cotton
90
20-30
37,000-55,555
50-70
Sunflower
90
15-25
40,000-60,000
60-95
1The numbers in this table are for ideal planting conditions. If seed quality is poor, or if you are planting under adverse conditions (e.g. dry planting, cloddy soils, old seed, etc.) you should increase seeding rates accordingly.
2Assumes drive wheel is 45 cm in diameter.
Appendix B: Traditional Maresha Dimensions
Appendix C: Planting Depth Adjustment Chart
Appendix D: Service Visit Checklist
Ask the service provider what calibration targets (seeding rates) they have been using for each crop they plant. If they seem unclear or unsure, go through the Calibration of Seed and Fertilizer procedures with them. Be sure they are using the proper pulleys for the seeding rate they wish to achieve.
Ask the service provider what planting depth they have been targeting, and how they have been achieving this (i.e. which brackets have they been adjusting?) Review the different Seeding Depth Adjustment options with them, and explain how much difference each adjustment will make.
Ask the service provider what daily maintenance procedures they use. Explain and go through the recommended Daily Maintenance procedures if they are not familiar with them.
Check brush position and adjust as needed.
Check meter calibration brackets to be sure they fit firmly against the rollers, but don’t bind on the corners of the flutes. Adjust as needed.
Measure the dimensions of the handle and point assembly. If they differ greatly from the Traditional Maresha Dimensions, ask if they have been encountering difficulties in proper point penetration or seeding depth. If so, help them adjust the length and/or angle of the point as needed
Ask the service provider if they have any other challenges, questions or suggestions.
Appendix E. Additional Resources
Farmer-Level Agricultural Training Resources [http://edn.link/farmertraining]. CFGB. A collection of farmer-level training modules for Conservation Agriculture and many other associated subjects available in many languages.
Conservation Agriculture; A Manual for Farmers and Extension Workers in Africa [http://edn.link/6nqk22]. IIRR and ACT. 2005. A thorough guide for small-scale farmers practicing Conservation Agriculture.
A Guide for Farmers on Reduced Tillage: Animal Drawn Ripping Option for Smallholder Farmers [http://edn.link/fyqx67], Africa Conservation Tillage Network.
Ox Conservation Farming: Setting up Ripper and Land Preparation [http://edn.link/ne77ye]. Conservation Farming Unit, Zambia. 2012. Leaflet No. 1.
Ox Conservation Farming: Basal Dressing and Planting seeds. Conservation Farming Unit, Zambia [http://edn.link/chhd9d]. 2012. Leaflet No. 3.
Cite as:
Rowe-Miller, R.N., H. Msanya, and H. Kirimbai. Maresha Planter: Owner's Manual. ECHO Technical Note no. 102. ECHO is a non-profit Christian organization.

 Soil Cover
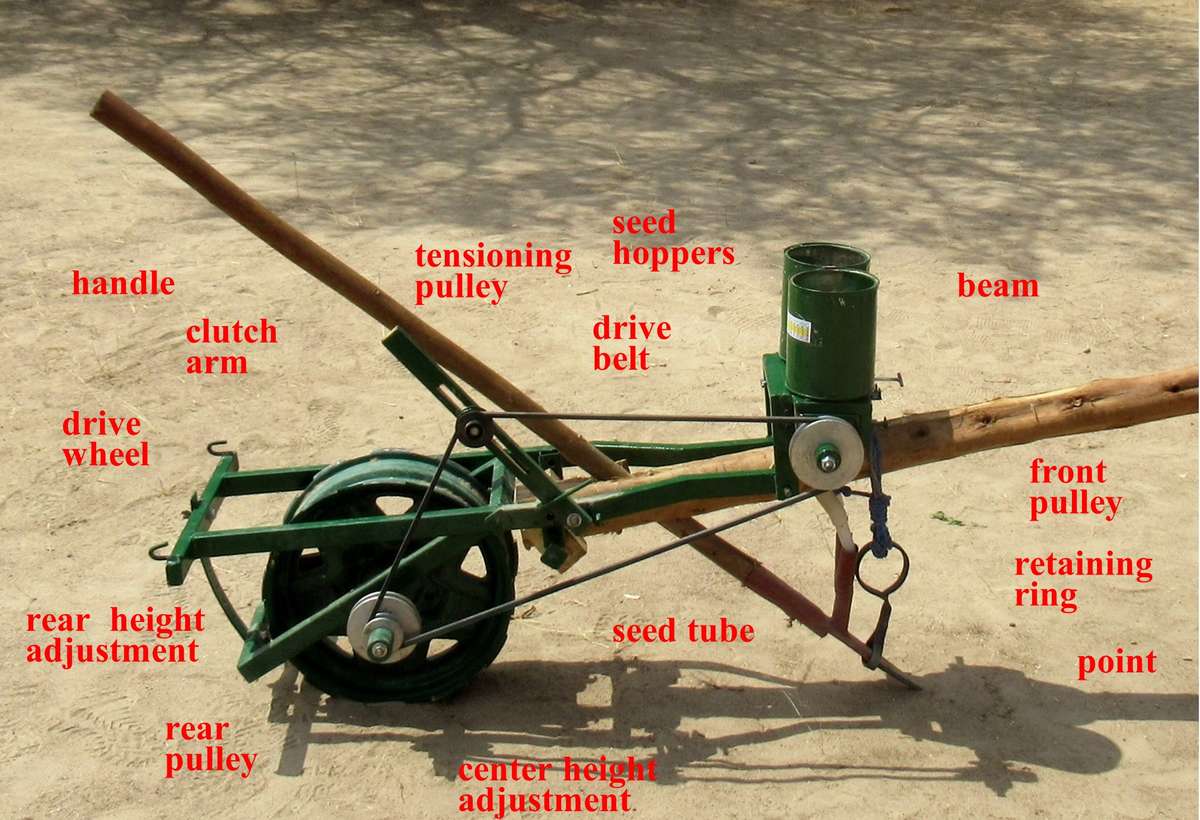
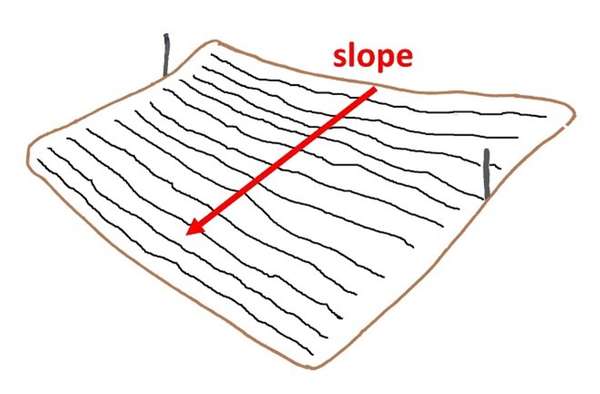 In order to reduce water movement and soil erosion, sloping land should always be planted along the contour, not up and down the slope.
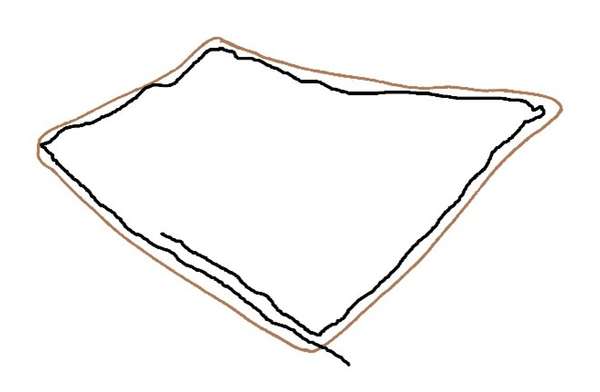 Because of the long beam of the maresha planter, it may be difficult for oxen to make tight turns. One solution to this problem is to plant while circling the entire field perimeter, planting both the sides and the ends of the field. In this way, the oxen will only need to turn 90 degrees at each corner instead of 180 degrees at the ends of the field. When you plant in this fashion, you may leave some gaps in the corners of the field. Planting 2-3 diagonal passes after planting the rest of the field will fill in these gaps.
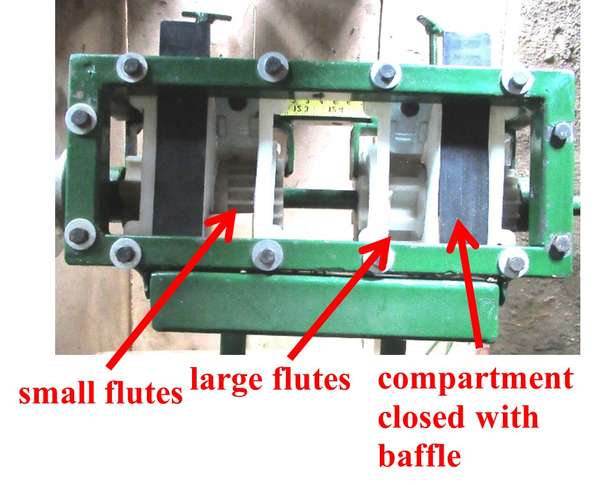
 Meter shaft removal
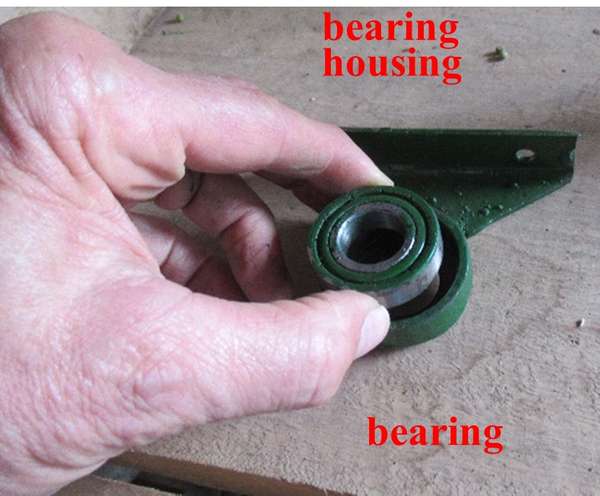 Once the meter shaft is removed, the bearings can simply be pressed out of the bearing housing for servicing or replacement (see picture). These bearings are sealed and do not need to be oiled or greased during use.
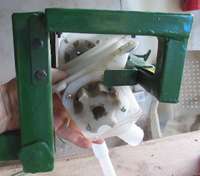
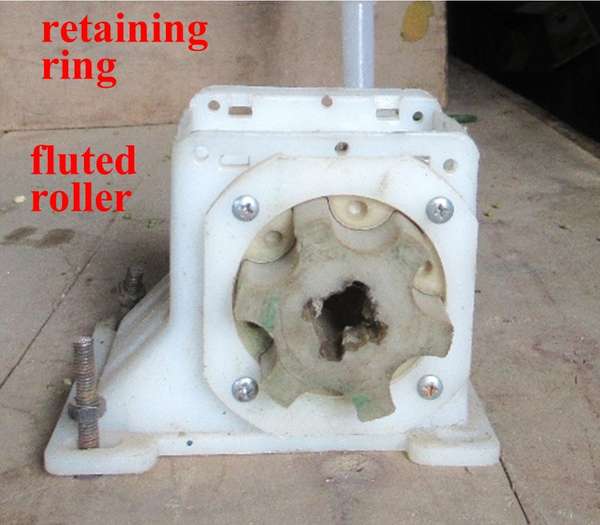 The fluted rollers can be removed and changed, repaired, or replaced if necessary. In order to remove the fluted rollers, first unscrew one of the retaining rings. Now the roller should slide out of its housing.